What’s this about?
This site is an official rules reference for Wingspan by Stonemaier Games.
It’s great for finding a specific rule quickly. It’s also an excellent supplement to the rulebook included in the box, when watching a how-to-play video, or while teaching the game.
Usage Tips
Back & Forward Nav: Think of each rule entry as a separate webpage. If you want to jump back, hit your Back button.
Check the Index : Don’t see what you’re looking for? The Index has every term in the game.
Install it: This site is a (Progressive Web App). You can install it as a standalone app that is lightning fast, and works even when you’re offline.
Link to a rule: Want to share a link to a particular rule? Just click its title!
Credits
Designed by Elizabeth Hargrave
Illustrated by Natalia Rojas, Ana Maria Martinez Jaramillo, Beth Sobel, and Martha Clare
See rulebooks for full credits.
- Last checked
Turn Overview
Place an action cube on the leftmost exposed slot in row on your player mat to take 1 of the following 4 actions:
Play One Bird
Select 1 bird card from your hand to play.
Discard the number of eggs from bird cards equal to the number of shown in the column where you want to/will place the bird.
Discard the shown food tokens (if , then there is no food cost). Wild (
 ) means you may use any food. You may spend any 2 food tokens to use them as any 1 food token.
Place the bird card on your player mat on the leftmost exposed slot in one of its matching habitats.
If the bird has a “when played” power, activate it (for that bird only). It may interact with the Automa.
Gain Food
Gain a number of food tokens equal to the number of
 shown on your leftmost exposed forest slot by removing the food dice from the birdfeeder and gaining the matching food tokens (, , or means you may take either one).
If the leftmost exposed forest slot shows
, you may discard 1 bird card from your hand to remove one additional die and take its corresponding food.Activate any brown forest bird powers you wish, right to left. They may interact with the Automa.
- Take a Hummingbird Action.
Lay Eggs
Gain a number of eggs equal to the number of shown on your leftmost exposed grassland slot. Place them on bird cards (up to the birds’ egg limits; any excess is lost).
If the leftmost exposed grassland slot shows
, you may pay 1 food token to gain one additional egg.Activate any brown grassland bird powers you wish, right to left. They may interact with the Automa.
- Take a Hummingbird Action.
Draw Cards
Draw bird cards equal to the number of shown on your leftmost exposed wetland slot. Draw from the face-up cards or the top of the bird deck. Do not replace the face-up cards until end of turn.
If the leftmost exposed wetland slot shows , you may discard 1 egg to gain one additional card.
Activate any brown wetland bird powers you wish, right to left. They may interact with the Automa.
- Take a Hummingbird Action.
- play a bird
-
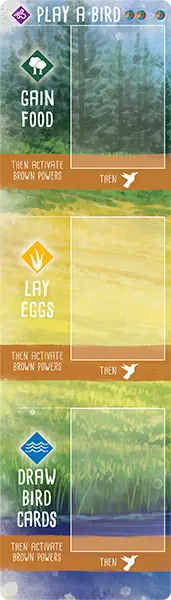
Play a Bird
Select 1 bird card from your hand to play.
Discard the number of eggs from bird cards equal to the number of shown in the column where you want to/will place the bird.
Discard the shown food tokens (if , then there is no food cost). Wild (
) means you may use any food. You may spend any 2 food tokens to use them as any 1 food token.Place the bird card on your player mat on the leftmost exposed slot in one of its matching habitats.
If the bird has a "when played" power, activate it (for that bird only). It may interact with the Automa.
- gain food
-
Gain Food
Gain a number of food tokens equal to the number of
shown on your leftmost exposed forest slot by removing the food dice from the birdfeeder and gaining the matching food tokens (, , or means you may take either one).If the leftmost exposed forest slot shows
, you may discard 1 bird card from your hand to remove one additional die and take its corresponding food.Activate any brown forest bird powers you wish, right to left. They may interact with the Automa.
- Take a Hummingbird Action.
- lay eggs
-
Lay Eggs
Gain a number of eggs equal to the number of shown on your leftmost exposed grassland slot. Place them on bird cards (up to the birds' egg limits; any excess is lost).
If the leftmost exposed grassland slot shows
, you may pay 1 food token to gain one additional egg.Activate any brown grassland bird powers you wish, right to left. They may interact with the Automa.
- Take a Hummingbird Action.
- draw cards
-
Draw Cards
Draw bird cards equal to the number of shown on your leftmost exposed wetland slot. Draw from the face-up cards or the top of the bird deck. Do not replace the face-up cards until end of turn.
If the leftmost exposed wetland slot shows , you may discard 1 egg to gain one additional card.
Activate any brown wetland bird powers you wish, right to left. They may interact with the Automa.
- Take a Hummingbird Action.
At any point during your turn, you can give exchange resources other players.
On Automa's turn, she performs the actions on the Automa card for the current round.
- draw cards
-
Draw Cards
- Discard all 3 bird cards from bird tray. Automa draws 1 from the bird deck and keeps it, face-down.
- Place a token on the Duet map, based on the Duet tracker.
- play a bird
-
Play a Bird
- Take all bird cards that match bonus card. Automa keeps highest point value card, faceup, and discards any others.
- If none match, Automa draws 1 and keeps it, face-down.
- Place a token on the Duet Map based on the End-of-round Goal and the Duet Tracker
- lay eggs
-
Lay Eggs
- Give Automa 1 egg for each egg icon shown.
- gain food
-
Gain Food
- If all dice show the same face, reroll all.
- Follow key, left to right, match first face type in birdfeeder and remove all of those dice.
- pink powers
-
Activate pink powers
- Activate all pink powers of bird cards on your player mat (the Automa does nothing).
- place cube
-
Place End-of-round Cube
- Place 1 action cube on the current round's goal tile.
- remove cube
-
Remove End-of-round Cube
- Remove 1 action cube from the current round's goal tile, if possible.
Then, Automa performs the hummingbird action for the current round.
 move a hummingbird
 nothing happens
At the end of each turn, refill empty spaces on the bird tray and hummingbird garden.
Round Structure
Wingspan is played over 4 rounds. During each round, players take turns—proceeding clockwise—until each player has used all of their available action cubes.
When all players have placed all of their action cubes, the round is over. Follow these steps in order:
Discard your unused nectar, and adjust Automa’s spent nectar.
Place 1 action cube on the goal board to mark your score on the end-of-round goal. Do the same for the Automa.
Score End-of-round goals for the Automa.
- Mark her rank on the goal board.
- Return her unused cubes to her supply.
- Advance her end-of-round goal scoring card.
-
If all players tied or beat Automarazzi for the end-of-round goal, each player gains from the supply to place on any bird on their player mat (egg limit rule applies).
Remove all action cubes from your player mat.
Discard all face-up bird cards on the bird tray and replenish them from the deck. Do the same for the hummingbird garden.
-
If Round 4 is over, go to game end & scoring. Otherwise, pass the first player token clockwise. Otherwise, pass the first player token clockwise, but Automarazzi still always goes last. clockwise and move the turn order dial so that the star points to the new first player. to the player who came in second on the end-of-round goal. If the players tied, then pass it to the other player.
-
Flip Automa’s round tracker cards for the next round.
-
From the Automa card deck, find any "Remove after round" cards for this round and return it to the box. Reshuffle the deck.
From both the Automa card deck and the Automa hummingbird card deck, find any “Remove after round” cards for this round and return them to the box. Reshuffle each deck.
You have fewer actions each round
Since you use 1 of your action cubes to mark your score on the end-of-round goal, you will have 1 fewer action cube to use each round:
- Round 1
- 8 turns per player
- Round 2
- 7 turns per player
- Round 3
- 6 turns per player
- Round 4
- 5 turns per player
Icons
-
Fish
-
Fruit
-
Rodent
-
Invertebrate
-
Seed
-
Nectar
-
Any food
-
No food
-
Food die
-
Invertebrate or Seed
-
Nectar or Seed
-
Nectar or Fruit
-
Play a
Bird Card -
Gain Food Forest
-
Lay Eggs Grassland
-
Draw Birds Wetland
-
Bowl nest
-
Cavity nest
-
Ground nest
-
Platform nest
-
Star (any nest)
-
Egg
-
Predator
-
Flocking
-
Bonus Cards
-
Egg Limit
-
Point Value
-
Wingspan
-
Played Bird
-
Bird Card
-
Reset Bird Tray
-
Reset Birdfeeder
-
Beak pointing left
-
Beak pointing right
-
Place Automa cube
-
Remove Automa cube
-
Hummingbird action
-
Bees & Mountaingems
-
Brilliants & Coquettes
-
Emeralds
-
Mangoes
-
Topazes, Jacobins, & Hermits
Components
 player mat overlay
 hummingbird garden
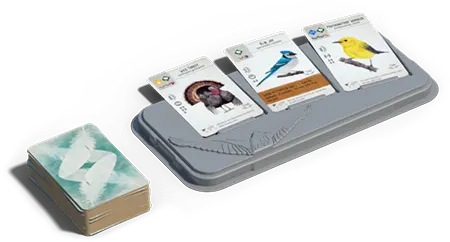
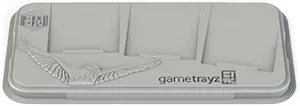 bird tray
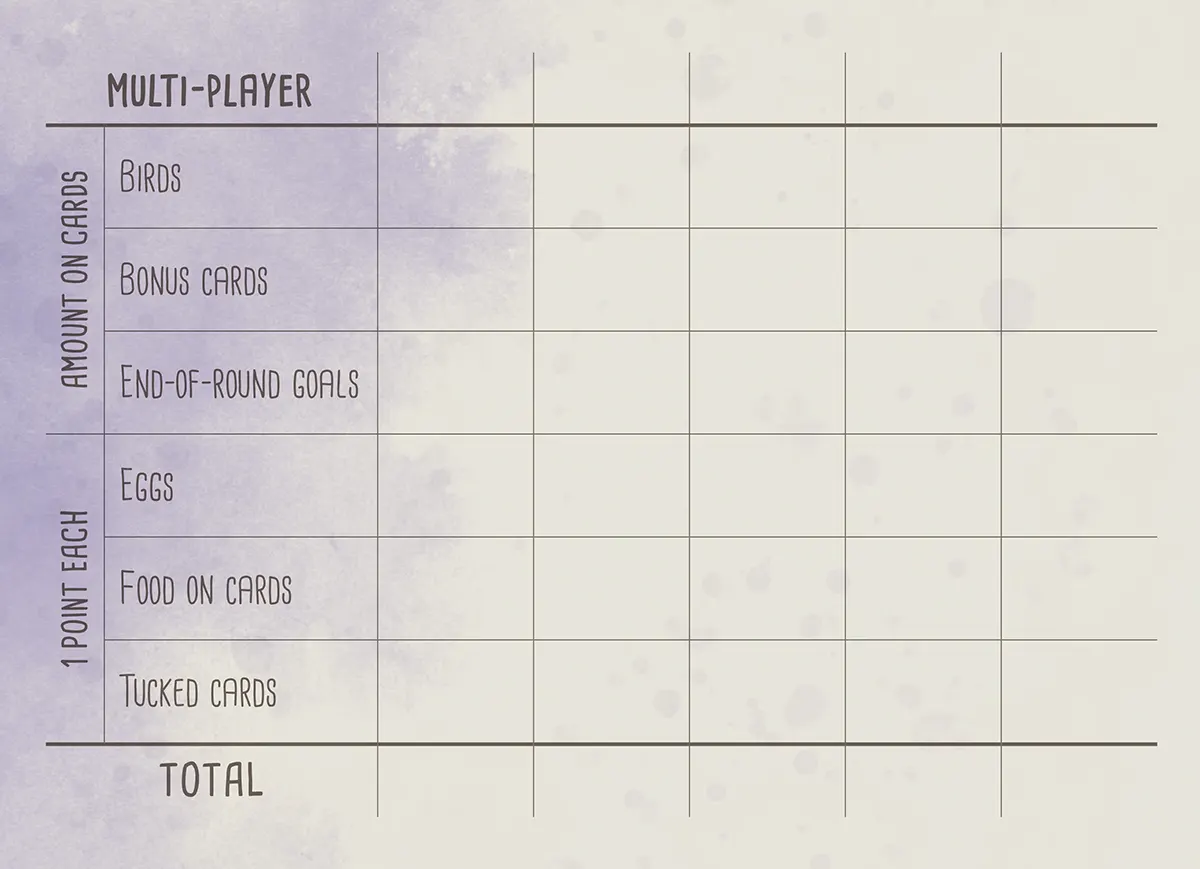
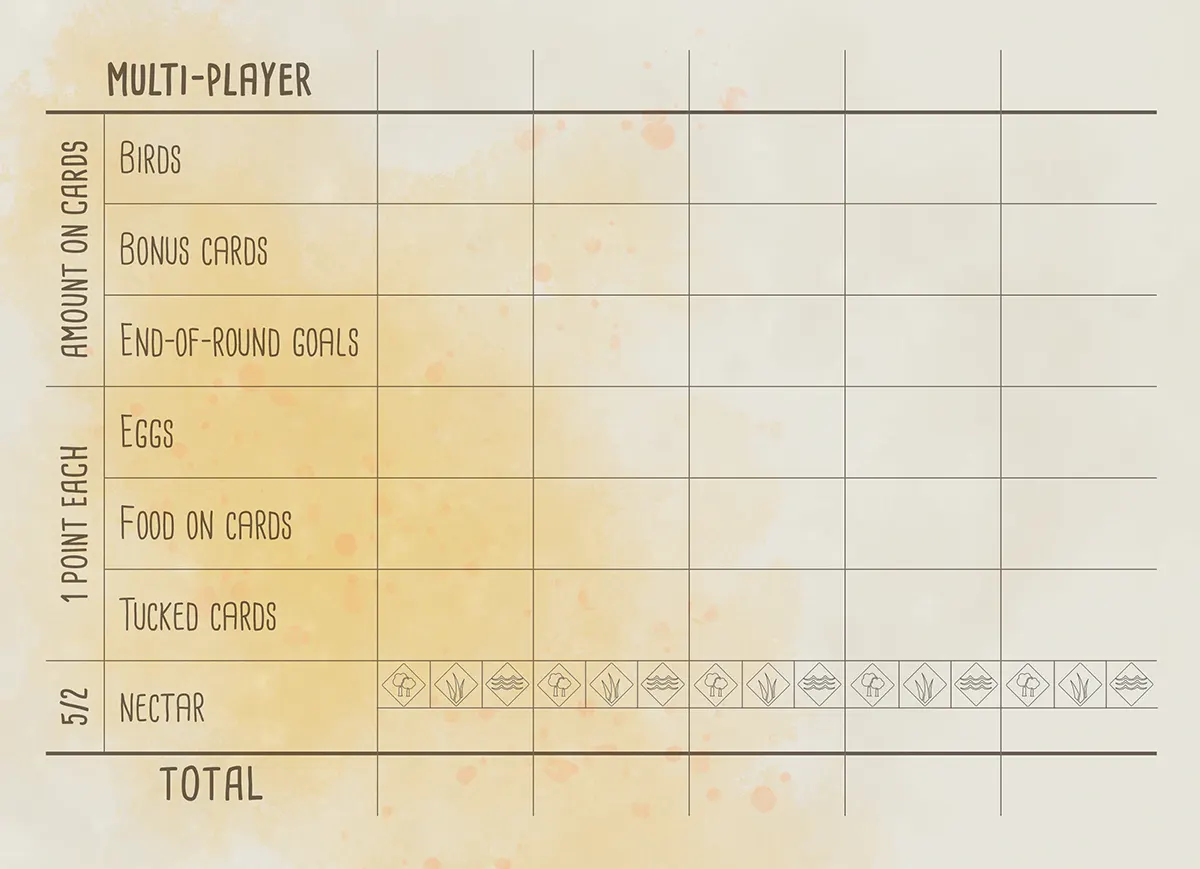 scorepad
 Duet map
Appendix: Bird Powers
- Abbott’s Booby
- Acorn Woodpecker
- Altamira Oriole
- Amazon Kingfisher
- Amazonian Parrotlet
- American Avocet
- American Bittern
- American Coot
- American Crow
- American Flamingo
- American Golden-Plover
- American Goldfinch
- American Kestrel
- American Oystercatcher
- American Redstart
- American Robin
- American White Pelican
- Andean Cock-of-the-Rock
- Andean Condor
- Anhinga
- Anna’s Hummingbird
- Antioquia Brushfinch
- Ash-Throated Flycatcher
- Asian Emerald Dove
- Asian Koel
- Atlantic Puffin
- Audouin’s Gull
- Australasian Pipit
- Australasian Shoveler
- Australian Ibis
- Australian Magpie
- Australian Owlet-Nightjar
- Australian Raven
- Australian Reed Warbler
- Australian Shelduck
- Australian Zebra Finch
- Azure Tit
- Baird’s Sparrow
- Bald Eagle
- Baltimore Oriole
- Bananaquit
- Barn Owl
- Barn Swallow
- Barred Antshrike
- Barred Owl
- Barrow’s Goldeneye
- Bat Falcon
- Baya Weaver
- Bearded Reedling
- Bell’s Vireo
- Belted Kingfisher
- Bewick’s Wren
- Black Drongo
- Black Noddy
- Black Rail
- Black Redstart
- Black Skimmer
- Black Stork
- Black Swan
- Black Tern
- Black Vulture
- Black Woodpecker
- Black-Bellied Whistling-Duck
- Black-Billed Magpie
- Black-Chinned Hummingbird
- Black-Crowned Night-Heron
- Black-headed Gull
- Black-naped Oriole
- Black-Necked Stilt
- Black-Shouldered Kite
- Black-tailed Godwit
- Black-throated Diver
- Blue Grosbeak
- Blue Jay
- Blue Rock-Thrush
- Blue-and-Yellow Macaw
- Blue-Black Grassquit
- Blue-Footed Booby
- Blue-Gray Gnatcatcher
- Blue-Gray Tanager
- Blue-Headed Parrot
- Bluethroat
- Blyth’s Hornbill
- Boat-Billed Heron
- Bobolink
- Bonelli’s Eagle
- Brahminy Kite
- Brambling
- Brant
- Brazilian Merganser
- Brazilian Teal
- Brewer’s Blackbird
- Broad-Winged Hawk
- Brolga
- Bronzed Cowbird
- Brown Falcon
- Brown Pelican
- Brown Shrike
- Brown-Headed Cowbird
- Budgerigar
- Bullfinch
- Burrowing Owl
- Bushtit
- California Condor
- California Quail
- Canada Goose
- Canvasback
- Carolina Chickadee
- Carolina Wren
- Carrion Crow
- Cassin’s Finch
- Cassin’s Sparrow
- Cedar Waxwing
- Cerulean Warbler
- Cetti’s Warbler
- Chestnut-Collared Longspur
- Chihuahuan Raven
- Chiloé Wigeon
- Chimney Swift
- Chipping Sparrow
- Clark’s Grebe
- Clark’s Nutcracker
- Clay-Colored Thrush
- Coal Tit
- Cockatiel
- Cocoi Heron
- Common Blackbird
- Common Buzzard
- Common Chaffinch
- Common Chiffchaff
- Common Cuckoo
- Common Goldeneye
- Common Grackle
- Common Green Magpie
- Common Iora
- Common Kingfisher
- Common Little Bittern
- Common Loon
- Common Merganser
- Common Moorhen
- Common Myna
- Common Nighthawk
- Common Nightingale
- Common Pauraque
- Common Raven
- Common Sandpiper
- Common Starling
- Common Swift
- Common Tailorbird
- Common Teal
- Common Yellowthroat
- Cooper’s Hawk
- Coppersmith Barbet
- Correndera Pipit
- Corsican Nuthatch
- Count Raggi’s Bird-of-Paradise
- Crested Ibis
- Crested Lark
- Crested Oropendola
- Crested Pigeon
- Crimson Chat
- Dark-Eyed Junco
- Desert Finch
- Desert Wheatear
- Dickcissel
- Double-Crested Cormorant
- Downy Woodpecker
- Dunnock
- Eastern Bluebird
- Eastern Imperial Eagle
- Eastern Kingbird
- Eastern Phoebe
- Eastern Rosella
- Eastern Screech-Owl
- Eastern Whipbird
- Elegant Trogon
- Eleonora’s Falcon
- Emu
- Eurasian Collared-Dove
- Eurasian Coot
- Eurasian Eagle-Owl
- Eurasian Golden Oriole
- Eurasian Green Woodpecker
- Eurasian Hobby
- Eurasian Hoopoe
- Eurasian Jay
- Eurasian Kestrel
- Eurasian Magpie
- Eurasian Marsh-Harrier
- Eurasian Nutcracker
- Eurasian Nuthatch
- Eurasian Sparrowhawk
- Eurasian Tree Sparrow
- Eurasian Treecreeper
- European Bee-eater
- European Goldfinch
- European Honey Buzzard
- European Robin
- European Roller
- European Turtle Dove
- Ferruginous Hawk
- Ferruginous Pygmy-Owl
- Fire-fronted Serin
- Firewood-Gatherer
- Fish Crow
- Forest Owlet
- Forster’s Tern
- Franklin’s Gull
- Galah
- Goldcrest
- Golden Eagle
- Golden Pheasant
- Golden-Headed Cisticola
- Golden-Headed Manakin
- Gould’s Finch
- Graceful Prinia
- Grandala
- Grasshopper Sparrow
- Grassland Sparrow
- Gray Catbird
- Gray Wagtail
- Great Blue Heron
- Great Cormorant
- Great Crested Flycatcher
- Great Crested Grebe
- Great Curassow
- Great Egret
- Great Hornbill
- Great Horned Owl
- Great Indian Bustard
- Great Kiskadee
- Great Potoo
- Great Spotted Woodpecker
- Great Tit
- Great-Tailed Grackle
- Greater Adjutant
- Greater Flamingo
- Greater Prairie-Chicken
- Greater Rhea
- Greater Roadrunner
- Green Bee-eater
- Green Heron
- Green Pheasant
- Green Pygmy-Goose
- Grey Butcherbird
- Grey Heron
- Grey Shrikethrush
- Grey Teal
- Grey Warbler
- Grey-Headed Mannikin
- Greylag Goose
- Griffon Vulture
- Harpy Eagle
- Hawfinch
- Hermit Thrush
- Himalayan Monal
- Hoatzin
- Hooded Crow
- Hooded Merganser
- Hooded Siskin
- Horned Guan
- Horned Lark
- Horsfield’s Bronze-Cuckoo
- Horsfield’s Bushlark
- House Crow
- House Finch
- House Sparrow
- House Wren
- Ibisbill
- Inca Dove
- Inca Tern
- Indian Peafowl
- Indian Vulture
- Indigo Bunting
- Jabiru
- Juniper Titmouse
- Kākāpō
- Kea
- Keel-Billed Toucan
- Kelp Gull
- Kererū
- Killdeer
- King Rail
- King Vulture
- Korimako
- Large-billed Crow
- Laughing Kookaburra
- Lazuli Bunting
- Least Seedsnipe
- Lesser Frigatebird
- Lesser Whitethroat
- Lewin’s Honeyeater
- Limpkin
- Lincoln’s Sparrow
- Lineated Woodpecker
- Little Blue Heron
- Little Bustard
- Little Egret
- Little Grebe
- Little Owl
- Little Penguin
- Little Pied Cormorant
- Little Ringed Plover
- Little Tinamou
- Loggerhead Shrike
- Long-tailed Tit
- Long-Wattled Umbrellabird
- Magnificent Frigatebird
- Magpie-Lark
- Major Mitchell’s Cockatoo
- Mallard
- Malleefowl
- Mandarin Duck
- Maned Duck
- Many-Colored Fruit-Dove
- Marsh Seedeater
- Masked Lapwing
- Mississippi Kite
- Mistletoebird
- Moltoni’s Warbler
- Monk Parakeet
- Montagu’s Harrier
- Mountain Bluebird
- Mountain Chickadee
- Mourning Dove
- Muscovy Duck
- Musk Duck
- Mute Swan
- Nanday Parakeet
- Neotropic Cormorant
- New Holland Honeyeater
- Noisy Miner
- North Island Brown Kiwi
- Northern Bobwhite
- Northern Cardinal
- Northern Flicker
- Northern Gannet
- Northern Goshawk
- Northern Harrier
- Northern Mockingbird
- Northern Shoveler
- Ocellated Turkey
- Oilbird
- Olive-backed Sunbird
- Orange-Breasted Bunting
- Orange-Footed Scrubfowl
- Oriental Bay-Owl
- Oriental Magpie-Robin
- Orinoco Goose
- Osprey
- Pacific Black Duck
- Painted Bunting
- Painted Whitestart
- Paradise Tanager
- Parrot Crossbill
- Peaceful Dove
- Peregrine Falcon
- Peruvian Sierra-Finch
- Pesquet’s Parrot
- Pheasant Coucal
- Philippine Eagle
- Pied-Billed Grebe
- Pileated Woodpecker
- Pine Siskin
- Pink-Eared Duck
- Plain Chachalaca
- Plains-Wanderer
- Plumbeous Redstart
- Princess Stephanie’s Astrapia
- Pūkeko
- Purple Gallinule
- Purple Heron
- Purple Martin
- Pygmy Nuthatch
- Rainbow Lorikeet
- Red Avadavat
- Red Crossbill
- Red Junglefowl
- Red Kite
- Red Knot
- Red Wattlebird
- Red-Backed Fairywren
- Red-backed Shrike
- Red-Bellied Woodpecker
- Red-Billed Scythebill
- Red-Breasted Meadowlark
- Red-Breasted Merganser
- Red-Breasted Nuthatch
- Red-Capped Robin
- Red-Cockaded Woodpecker
- Red-Crested Cardinal
- Red-crowned Crane
- Red-Eyed Vireo
- Red-Headed Barbet
- Red-Headed Woodpecker
- Red-legged Partridge
- Red-Legged Seriema
- Red-Necked Avocet
- Red-Shouldered Hawk
- Red-Tailed Hawk
- Red-vented Bulbul
- Red-Wattled Lapwing
- Red-Winged Blackbird
- Red-Winged Parrot
- Regent Bowerbird
- Resplendent Quetzal
- Rhinoceros Auklet
- Ring-Billed Gull
- Roadside Hawk
- Rock Pigeon
- Rook
- Rose-Breasted Grosbeak
- Rose-ringed Parakeet
- Roseate Spoonbill
- Rosy Starling
- Royal Spoonbill
- Ruby-Crowned Kinglet
- Ruby-Throated Hummingbird
- Ruddy Duck
- Ruddy Ground Dove
- Ruddy Shelduck
- Rufescent Tiger-Heron
- Ruff
- Rufous Hornero
- Rufous Night-Heron
- Rufous Owl
- Rufous-Banded Honeyeater
- Rufous-Collared Sparrow
- Rufous-Naped Wren
- Sacred Kingfisher
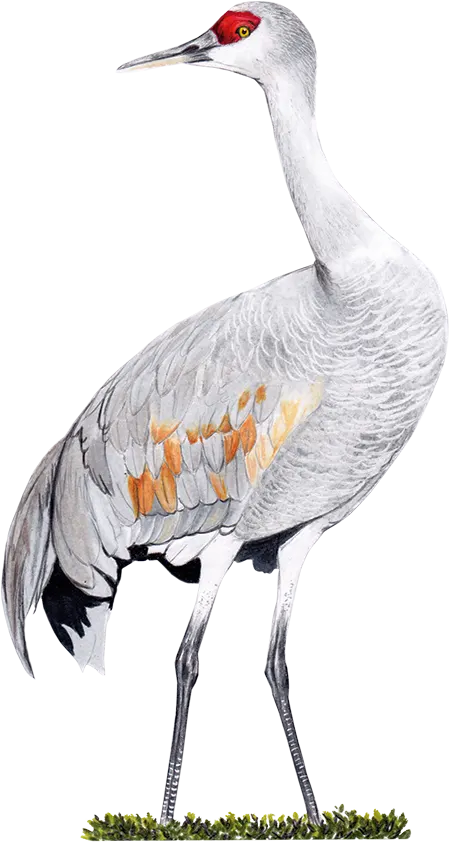
- Sandhill Crane
- Sarus Crane
- Satyr Tragopan
- Savanna Hawk
- Savannah Sparrow
- Savi’s Warbler
- Say’s Phoebe
- Scaled Quail
- Scaly-breasted Munia
- Scarlet Ibis
- Scarlet Macaw
- Scissor-Tailed Flycatcher
- Screaming Piha
- Shiny Cowbird
- Short-toed Treecreeper
- Silvereye
- Small Minivet
- Smew
- Smooth-Billed Ani
- Snow Bunting
- Snowy Albatross
- Snowy Egret
- Snowy Owl
- Song Sparrow
- South Island Robin
- Southern Cassowary
- Southern Lapwing
- Southern Rough-Winged Swallow
- Southern Screamer
- Spangled Drongo
- Spectacled Owl
- Splendid Fairywren
- Spoon-billed Sandpiper
- Spotless Crake
- Spotted Dove
- Spotted Nothura
- Spotted Owl
- Spotted Puffbird
- Spotted Sandpiper
- Spotted Towhee
- Sprague’s Pipit
- Squacco Heron
- Squirrel Cuckoo
- Sri Lanka Blue-Magpie
- Sri Lanka Frogmouth
- Steller’s Jay
- Stork-billed Kingfisher
- Strange-Tailed Tyrant
- Stubble Quail
- Sulphur-Crested Cockatoo
- Sun Parakeet
- Sunbittern
- Sungrebe
- Superb Lyrebird
- Swainson’s Hawk
- Tawny Frogmouth
- Thekla’s Lark
- Titicaca Grebe
- Toco Toucan
- Tree Swallow
- Tropical Kingbird
- Tropical Parula
- Tropical Royal Flycatcher
- Trumpeter Finch
- Tufted Titmouse
- Tūī
- Turkey Vulture
- Turquoise-Browed Motmot
- Twite
- Ultramarine Grosbeak
- Vampire Ground-Finch
- Variable Seedeater
- Vaux’s Swift
- Verdin
- Verditer Flycatcher
- Vermilion Flycatcher
- Violet Cuckoo
- Violet-Green Swallow
- Wattled Jacana
- Wedge-Tailed Eagle
- Welcome Swallow
- Western Meadowlark
- Western Rockhopper Penguin
- Western Tanager
- White Stork
- White Wagtail
- White-backed Woodpecker
- White-Bellied Sea-Eagle
- White-Breasted Nuthatch
- White-Breasted Woodswallow
- White-Browed Tit-Spinetail
- White-browed Tit-Warbler
- White-crested Laughingthrush
- White-Crowned Sparrow
- White-Faced Heron
- White-Faced Ibis
- White-headed Duck
- White-throated Dipper
- White-throated Kingfisher
- White-Throated Magpie-Jay
- White-Throated Swift
- White-Tipped Dove
- Whooping Crane
- Willet
- Willie-Wagtail
- Willow Tit
- Wilson’s Snipe
- Wilson’s Storm-Petrel
- Wood Duck
- Wood Stork
- Wrybill
- Yellow Bittern
- Yellow Warbler
- Yellow-Bellied Sapsucker
- Yellow-Billed Cuckoo
- Yellow-Breasted Chat
- Yellow-Headed Blackbird
- Yellow-Headed Caracara
- Yellow-Rumped Warbler
- Yellowhammer
- Zebra Dove
Appendix: End-of-Round Goals
-
in
Count the total number of birds you currently have in your forest habitat row.
-
in
Count the total number of birds you currently have in your grassland habitat row.
-
in
Count the total number of birds you currently have in your wetland habitat row.
-
with
Count the total number of birds with a bowl nest that have at least 1 egg. Each bird counts just once, regardless of how many eggs it has. Star nests count toward this goal.
-
with
Count the total number of birds with a cavity nest that have at least 1 egg. Each bird counts just once, regardless of how many eggs it has. Star nests count toward this goal.
-
with
Count the total number of birds with a ground nest that have at least 1 egg. Each bird counts just once, regardless of how many eggs it has. Star nests count toward this goal.
-
with
Count the total number of birds with a platform nest that have at least 1 egg. Each bird counts just once, regardless of how many eggs it has. Star nests count toward this goal.
-
in
Count the total number of eggs your birds have laid in your forest habitat row. Multiple eggs on one bird each count.
-
in
Count the total number of eggs your birds have laid in your grassland habitat row. Multiple eggs on one bird each count.
-
in
Count the total number of eggs your birds have laid in your wetland habitat row. Multiple eggs on one bird each count.
-
in
Count the total number of eggs on birds with a bowl nest. Multiple eggs on one bird each count. Star nests count toward this goal.
-
in
Count the total number of eggs on birds with a cavity nest. Multiple eggs on one bird each count. Star nests count toward this goal.
-
in
Count the total number of eggs on birds with a ground nest. Multiple eggs on one bird each count. Star nests count toward this goal.
-
in
Count the total number of eggs on birds with a platform nest. Multiple eggs on one bird each count. Star nests count toward this goal.
-
Sets of in
One set of eggs consists of 1 egg in the wetland row, 1 egg in the grassland row, and 1 egg in the forest row. Count the number of sets. For this goal you’re only counting the eggs in each habitat. It does not matter on which birds or columns the eggs are placed.
For example, Natalia has 3 eggs in her forest, 2 eggs in her grassland, and 4 eggs in her wetland habitats. For this end-of-round goal, Natalia has 2 sets of eggs.
-
Total
Count the total number of birds you have played.
-
in food cost of your birds
Count the number of the symbol(s) that are in the food costs of your bird cards. Do not count
or .
-
No Goal
Don’t score a goal at the end of this round. Keep your cube. All of the following rounds will have 1 more turn than they normally would.
-
Beak Pointing Left
This goal counts cards that show a bird whose beak is facing left. Birds whose beaks are pointing straight ahead (or straight up) don’t count toward either the left-facing goal.
-
Beak Pointing right
This goal counts cards that show a bird whose beak is facing right. Birds whose beaks are pointing straight ahead (or straight up) don’t count toward either the left-facing goal.
-
on “Play a Bird”
Count the number of cubes you placed on play a bird this round. Note that this goal requires you to keep your action cubes in the rows where you played them.
-
+ in food cost of your birds
Count the number of the food symbol(s) on this goal tile that are in the food costs of your bird cards. Look at the food cost in the upper left of the birds you have played onto your mat, and count all plus all . If a bird has a “/” cost (you paid a OR a to play the bird), it only counts as one food for this end round goal. Do not count
or .
-
worth
The number of your played birds with a printed value of 3 or fewer points
-
in personal supply
The number of food tokens in your personal supply
-
worth
The number of your played birds with a printed value over 4 points
-
in one row
The number of your played birds in the habitat that has the most birds in it
-
Brown powers
The number of your played birds that have brown "when activated' powers on them
-
birds with tucked cards
The number of your played birds that have at least 1 card tucked behind them
-
filled columns
The number of columns in which all three bird spaces are filled
-
with no
The number of your played birds that have no eggs on them when this goal is scored
-
in hand
The number of bird cards in your hand
-
Food cost of played
Count the food cost on your birds, remembering to count only 1 food for birds that have a choice in their food cost
-
White & no powers
The number of your played birds that have either no power, or a “when played” power
-
progress
How far your token has advanced the column of the hummingbird track. Players who have negative or zero Hummingbird Points values are still eligible to score this goal as long as they’ve moved up the track at least once.
On the blue side of the goal mat, look at the point value of your token (not the number of spaces you have advanced).
-
Hummingbird Points
On the green side of the goal mat, look at the total score for all your tokens on the hummingbird track.
On the blue side of the goal mat, look at the point value of your best hummingbird track.
-
Total of Egg Limits
Look at the egg limit printed on each of your birds and add them together.
On the blue side of the goal mat, divide the total by 5, and round down.
-
Different point values on birds
Look at the point values printed on your birds. Count up how many different numbers you have represented in your preserve. If you have a hummingbird in your preserve, you may count it as a 0.
-
 in
in Count the number of Duet tokens on the map in the forest. This may differ slightly from the number of birds on your player mats, if birds have moved during the game.
-
in
Count the number of Duet tokens on the map in the grassland. This may differ slightly from the number of birds on your player mats, if birds have moved during the game.
-
in
Count the number of Duet tokens on the map in the wetland. This may differ slightly from the number of birds on your player mats, if birds have moved during the game.
-
in any one horizontal row
Each player chooses the horizontal row on the map that is best for them and counts the number of their Duet tokens in that row. Tokens do not need to be in a contiguous group.
-
Horizontal rows with at least one of your
For the six horizontal rows of the map, count how many of them have at least one of your Duet tokens.
-
not on edge of map
Each edge of the map has 6 spaces on it: the sides each have 3 indented spaces that are still on the edge. This makes a total of 20 edge spaces and 16 interior spaces. For this goal, count how many tokens are in the interior.
-
not on edge of map
Each edge of the map has 6 spaces on it: the sides each have 3 indented spaces that are still on the edge. This makes a total of 20 edge spaces and 16 interior spaces. For this goal, count how many tokens are on the edge.
-
on
Count all Duet tokens on spaces that have any nest symbol ( ). Symbols may repeat (i.e., tokens on two different spaces both count).
-
on
Count all Duet tokens on spaces that have any food symbol ( ). Symbols may repeat (i.e., tokens on two different spaces both count).
-
on pairs of matching symbols
Each player counts how many of their Duet tokens are on a pair of matching spaces. Symbols must match exactly, such as two rodents or two 50+ cm wingspan spaces, but bonuses do not need to match. Each token only counts once.
-
Total
on mapCount the total number of Duet tokens on the map. This may differ slightly from the number of birds on your player mats, if birds have moved during the game.
-
Fewest
on bonus spacesBonus spaces are the spaces that award
// when you put a token on them. Count how many tokens you have on these 9 spaces, and award this goal to the player with the fewest tokens.
Appendix: Bonus Cards
Some bonus cards benefit from additional clarification found in the printed appendices…
- Anatomist
- Avian Theriogenologist
- Backyard Birder
- Bird Counter
- Breeding Manager
- Cartographer
- Ecologist
- Enclosure Builder
- Endangered Species Protector
- Falconer
- Forest Data Analyst
- Forest Population Monitor
- Forest Ranger
- Forester
- Grassland Data Analyst
- Grassland Population Monitor
- Grassland Ranger
- Historian
- Large Bird Specialist
- Mechanical Engineer
- Nest Box Builder
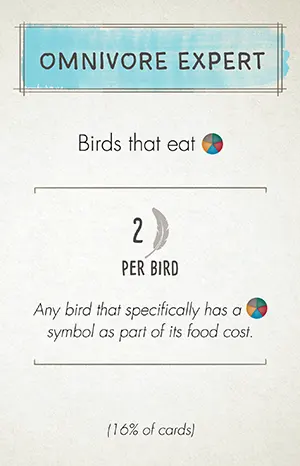
- Omnivore Expert
- Oologist
- Passerine Specialist
- Pellet Dissector
- Photographer
- Platform Builder
- Prairie Manager
- Site Selection Expert
- Small Clutch Specialist
- Visionary Leader
- Wetland Data Analyst
- Wetland Population Monitor
- Wetland Ranger
- Wetland Scientist
- Wildlife Gardener
- Winter Feeder
Game End and Scoring
The game ends at the conclusion of Round 4. First activate your game-end bird powers (but not for the Automa's birds), then uUse the scorepad to add together the following for your score:
Example: 3 points
- Points for each face-up bird card on your player mat (printed on the cards)
- Points for each bonus card (printed on the cards)
- Points for end-of-round goals (shown on goal board)
- 1 point for each:
- Points earned (or lost) on your hummingbird track
- For each habitat:
- The player with the most nectar receives 5 points, and
- The player with the second-most nectar receives 2 points.
- Score 1 point for each Duet token in your largest contiguous group.
- Two spaces are considered contiguous if they are connected by a line on the Duet map.
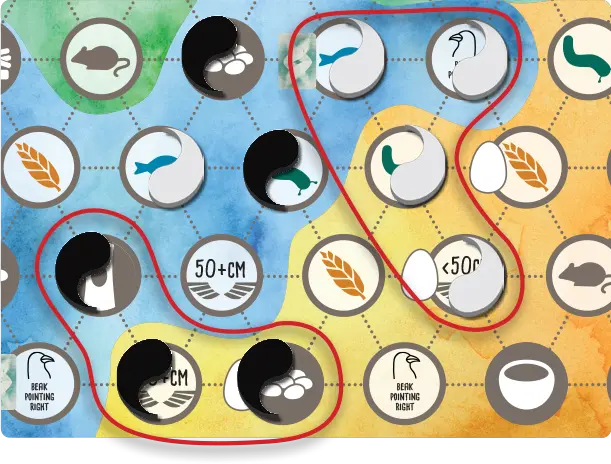
Example: In this board snippet, the white player receives 4 points and the black player receives 3 points.
The player who has the most points wins. In the case of a tie, the player with the most unused food tokens wins. If players are still tied, they share the victory.
Automa Scoring
Before calculating her final score, Automa gains 1 egg for every 3 4 5 cache hoard tokens she returns to the supply.
To calculate her final score, Automa gets:
- Points printed on each of her face-up bird cards.
- 5 4 3 points for each of her face-down bird cards.
- 1 point for each egg she collected.
- Points from the Duet map end-of-round goals as shown on the Duet map board, including points for her largest contiguous group of Duet tokens.
- Points from the end-of-round goals as shown on the goal board.
- Score Automa's hummingbird track normally and add to her final score.
Note: Automa doesn’t gain points from her bonus card.
The player who has the most points wins. In the event of a tie, Automa wins if she has more remaining tokens than you have remaining food tokens.
Compare the average score of you and your teammates against Automarazzi’s score. If it is higher than Automarazzi’s score, you win!
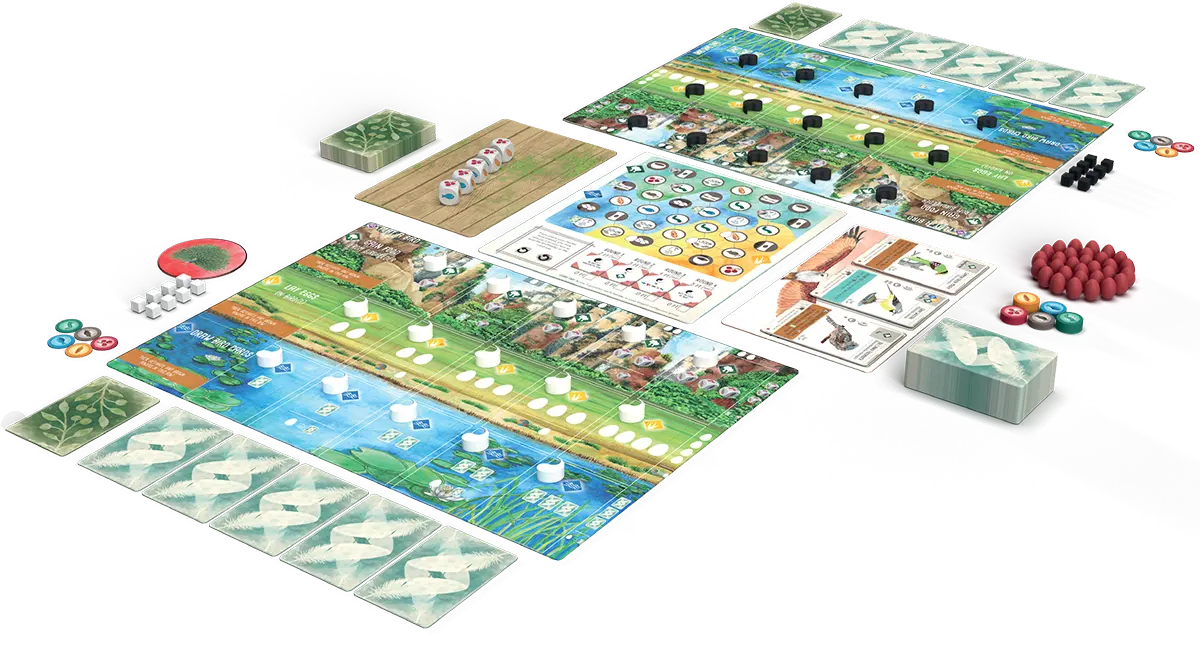
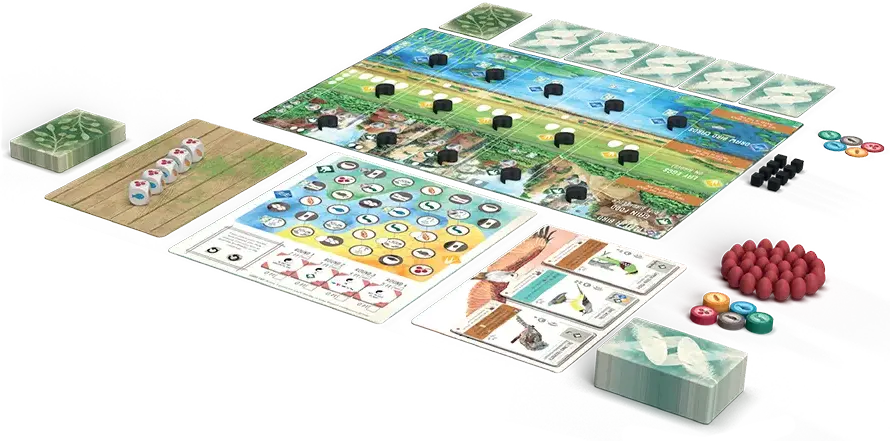
Setup
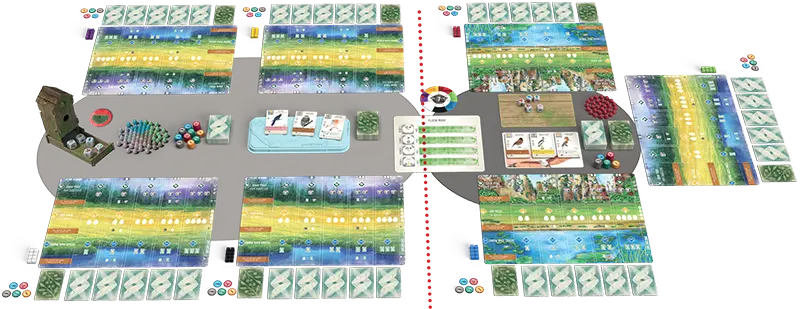
Split the players into 2 groups at the same table (3+3 for a 6-player game or 3+4 for a 7-player game). These groups remain fixed for the entire game.


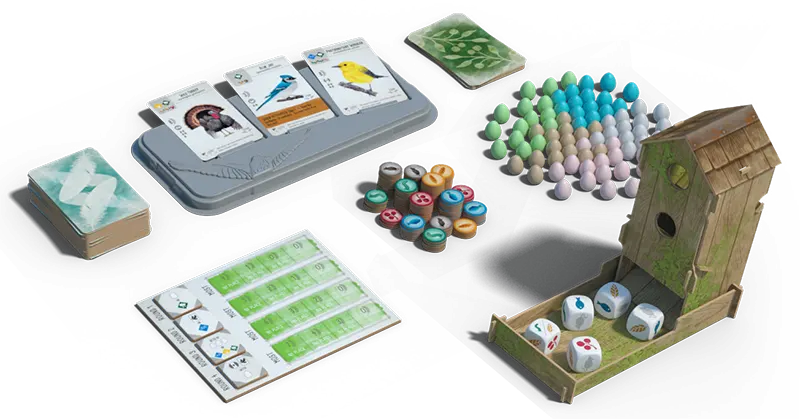
- Bird cards. Shuffle the bird cards into a deck. Place it next to the bird tray, then populate the tray with 3 face-up bird cards.
- Supply. Place all food and egg tokens in the supply. These are tokens accessible to all players.
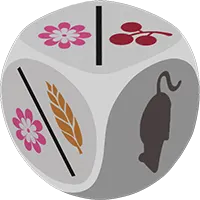
- Birdfeeder. Toss the food dice into the birdfeeder dice tower.
- Bonus cards. Shuffle the bonus cards into a deck and place it on the table.
- Goal board. Choose which type of goals you will play with, and place the goal board on the table with that side facing up:
- Green: For a game with more direct competition for goals, choose the side that has 1st, 2nd, and 3rd place for each goal. This is the default.
- Blue: For a game with less direct competition between players, choose the side that awards 1 point for each targeted item. This is good for new players.
- Goal tiles. Shuffle the goal tiles without looking at them (they’re double-sided). Place 1 goal tile (random side up) on each of the four blank spaces on the goal board. Return extra goal tiles to the box.
- Duet map and Goal tiles. Use the Duet map and Duet end-of-round goal tiles. The goals are double-sided and marked with red corners. Choose 4 at random and put them in the 4 slots below the Duet map. Do not use the “ on edge of map” or “ not on edge of map” goals. Return extra goal tiles to the box.
You must use the green side of the goal mat when including the hummingbird points goal, total of egg limits goal, or any of the goals with a single hummingbird group symbol. They are not compatible with the scoring rules for the blue side of the goal mat when playing against Automa.
- Turn-order dial. Place the turn-order dial in the middle of the table. The dial has two pieces; make sure that both pieces have the correct side facing up (6 or 7 players). Distribute the player action cubes to players around the table in exactly the same order as the colors on the dial (players may want to sit accordingly if they have a favorite color).
- Bird cards. Shuffle the bird cards into a deck; you will need to combine bird cards from the base game and/or another expansion to have enough for a 6-7 player game). Split the deck in half, place it next to a bird tray for each group, then populate each tray with 3 face-up bird cards.
- Supply. Place all food tokens and egg miniatures in the supply. These are accessible to all players.
- Birdfeeders. Each group has their own birdfeeder populated with 5 dice. If playing with the Oceania Expansion, each group uses 2 nectar dice and 3 regular food dice.
- Bonus cards. Shuffle all available bonus cards (except the Historian) into a single deck and place it on the table for both groups to share.
- Goal tiles. Use one set of goal tiles for the entire table (use standard goal tiles, not the Duet goal tiles with red corners). Shuffle the goal tiles without looking at them (they’re double-sided). Place 1 goal tile (random side up) on each of the 4 blank spaces on the new Flock mode goal board (on the back side of the Duet map). Return extra goal tiles to the box.
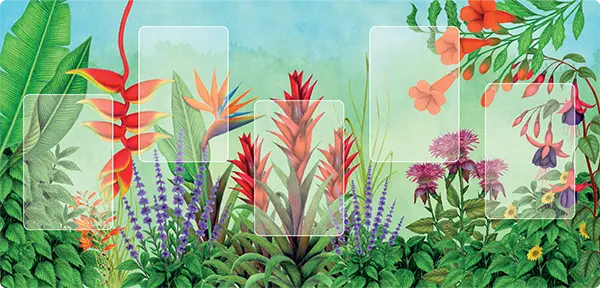
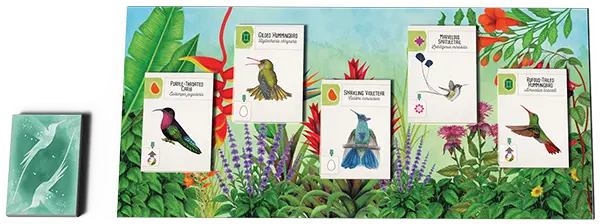
Hummingbird garden
-
Place the hummingbird garden board in the middle of the table with other shared components.
-
Shuffle the deck of hummingbirds and place it face down to the side of the board.
-
Place 1 hummingbird face up on each of the 5 spaces on the garden board.

-
Each player receives:
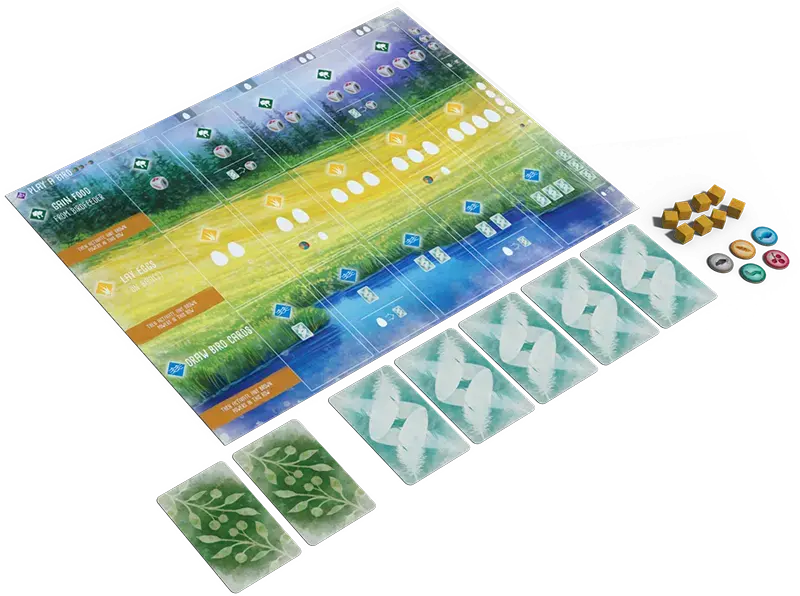
- 1 player mat
- 8 action cubes of one color
- 2 random bonus cards
- 1 nectar token
- 5 random bird cards
- 5 food tokens (1 of each type: )
You may keep your hand of cards private or public throughout the game.
-
Keep up to 5 bird cards and discard the others. For each bird card you keep, you must discard 1 food token. You will probably want to keep food tokens shown in the upper left of the bird cards you selected. For example, you might keep 2 bird cards and 3 food, or you might keep 4 bird cards and 1 food.
-
Choose 1 bonus card to keep, and discard the other. You may look at your bonus cards while selecting which birds to keep (and vice versa).
- Place 1 Duet token in your player color on each of the 15 bird slots on your player mat. You will place a Duet token on the Duet map each time you play a bird.
-
Randomly select the first player and give them the first-player token. Then rotate the turn-order dial so the star points to the player with the first-player token (purple in this 7-player example).
-
Randomly select the first player and give them the first-player token, but Automarazzi still goes last.
Hummingbirds (per player)
-
Place a hummingbird overlay on the left section of your player mat. Since you’re playing with the Oceania expansion, place the overlay nectar side up.
-
Draw a random hummingbird card from the deck and place it on the hummingbird space on your grassland.
-
Place either side of a random hummingbird track next to your player mat, and place 5 tokens, one on each of the spaces marked S-T-A-R-T.

Automa needs a small area on your table for her things.
- Place the current round tracker card in the center of that area flipped and oriented to show “Round 1” in the banner at the top.
- Place the Duet map tracker card immediately to its right, also with “Round 1” at the top.
- Shuffle the Automa cards, along with at most 1 special Automa cardthe Automasian Alliance card, and place them face-down to the right of the tracker card(s). This is the Automa deck.
- Give Automa action cubes of an unused color.
- Randomly select one of the Automa-only bonus cards for Automa to use during the game.
Alternatively…
Automa can use any of the bonus cards that show (X% of cards) at the bottom of the card. Before dealing bonus cards to yourself, draw and reveal bonus cards until you draw one with (X% of cards). Give that bonus card to Automa to use during the game and reshuffle the bonus deck before continuing with setup. Note: For Pellet Dissector she takes birds that can cache food.
-
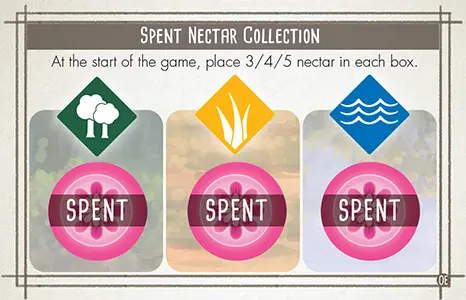 Place the Spent Nectar Collection card in the area you set up for Automa and place 5 4 3 in each habitat box.
-
- Give Automa a random hummingbird track and place 5 tokens, one on each of the spaces marked S-T-A-R-T.
For the end-of-round goal tile for Round 1, place the corresponding end-of-round goal scoring card beside the goal mat, with “Round 1” facing up.
You always take the first turn of each round and Automa always takes the last.
Some bird powers refer to a player to your left or right. Before the game begins, if it isn’t clear from where you locate Automarazzi’s area, assign her a seat at the table so you will be able to resolve these powers.
The Automa
When playing against the Automa, you will always follow the multiplayer rules. The Automa, however, does not play by the rules.
- Automa will not get a player mat or a starting hand of birds and food.
- Automa will gather birds, eggs, and sometimes food, but they are only used for scoring.
- Automa does not need to ‘pay’ anything for the actions she takes.
- For anything you do that involves other players, Automa only participates as defined by these rules.
Automa Cards Index
Automa Cards
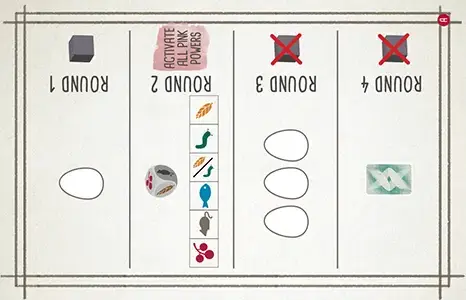
Each Automa card is divided into 4 sections, one for each of the rounds. Only the section for the current round will be used. The other round sections are ignored.
Each section contains one or more icons representing the actions Automa will take during her turn.
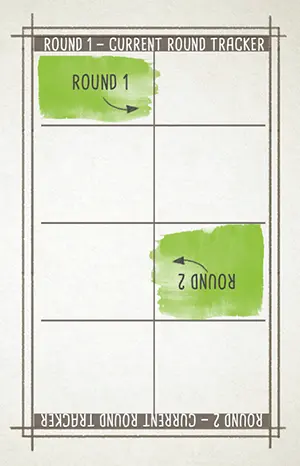
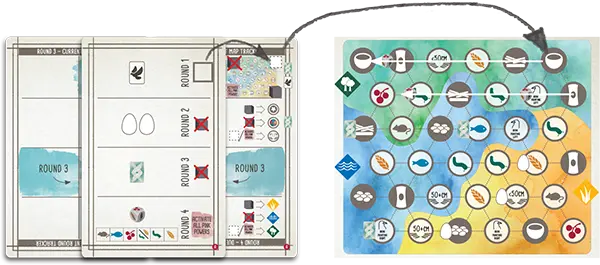
Current Round Tracker
The current round tracker card is provided to help you remember the correct section to examine on the Automa card.
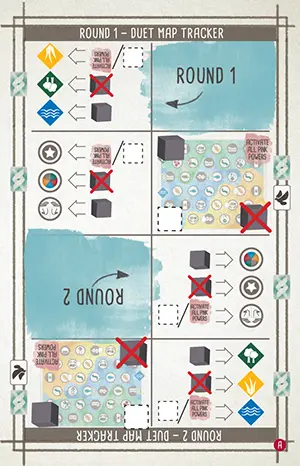
Duet Map Tracker Card
When you place a Duet token for the Automa, the Duet map tracker card tells you how to navigate the Duet map. It also tells you where to place the token when the Automa takes the "draw cards" action.
Automa Bonus Cards
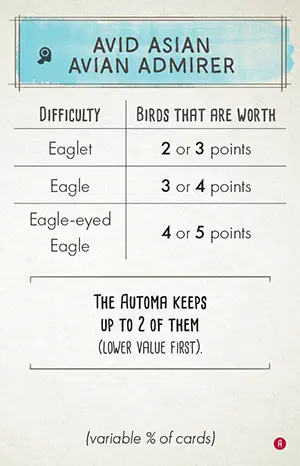
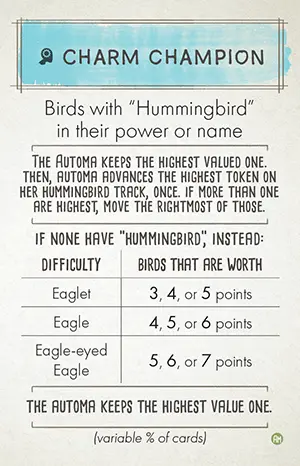
The Automa uses bonus cards to determine which bird cards she takes when she uses the "play a bird" action. You can use one of the special Automa-only bonus cards shown here, or any standard bonus card that show (X% of cards) at the bottom of the card.
The Automa does not score points for her bonus card at the end of the game.
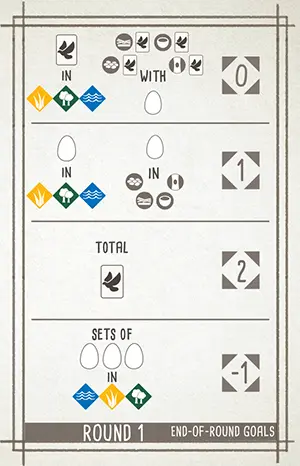
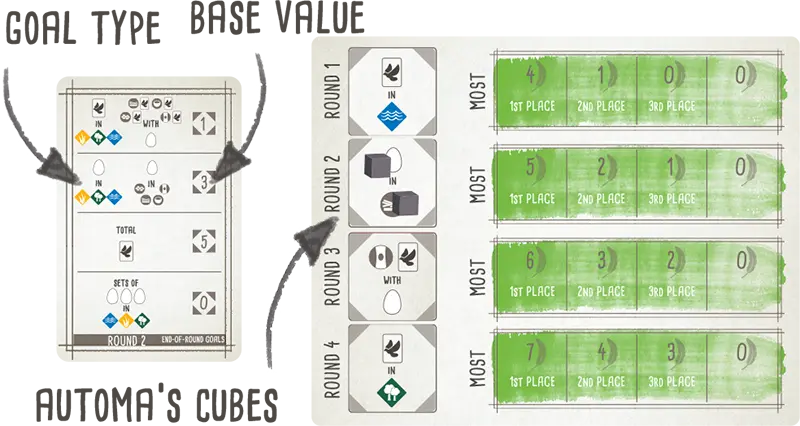
End-of-round Goal Scoring Cards
These cards tell you the base value when scoring Automa's end-of-round goals.
Automa Nectar Cards
These cards are used to keep track of how much nectar Automa has, and how much she gains or loses at the end of each round.
Automa Hummingbird Cards
The Americas expansion includes a set of smaller cards used whenever you include hummingbirds. The set comprises 10 regular cards and 2 difficulty adjustment cards.
Hummingbird Current Round Tracker
Place this card near the Automa deck to track which round section to use on the hummingbird cards.
The Automa’s Turn
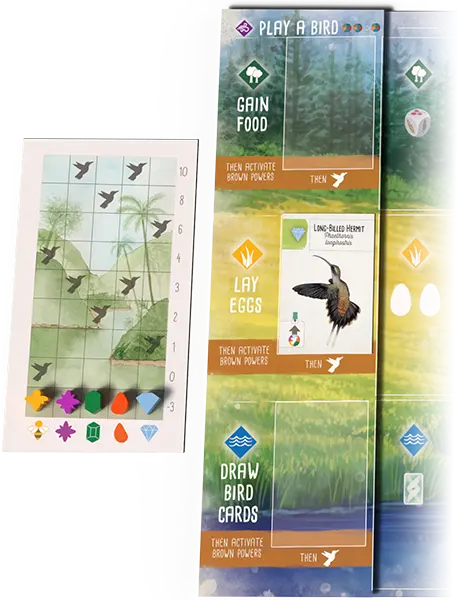
On Automa’s turn, draw a single card from the Automa deck and place it face up on top of any previously revealed Automa cards, covering half of the tracker cards and lined up against the arrows. The arrow points to the section you will use for the current round. Resolve each action icon in that section. The other three sections are ignored.
In this example, the Automa will perform the “Lay Eggs” action and then place an action cube on the round 1 goal tile.
In this Duet mode example it is round 1. Automa will perform the “Lay Eggs” action, place an action cube on the round 1 goal tile, and then use the icons in the right column to determine where she will place a Duet token on the Duet map.
Then, Automa will follow the same procedure with a Automa hummingbird mini card, resolving its action for the current round.
In this round 1 example, the Automa will move 1 hummingbird from one space to another space in the hummingbird garden, as indicated by the arrow.
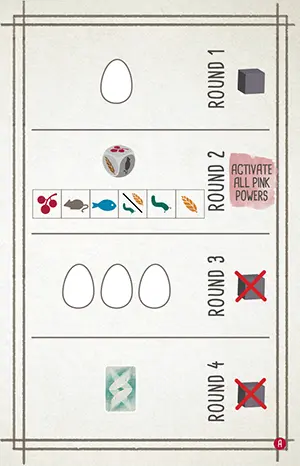
Automa Actions
Draw Cards
Discard all 3 face-up cards from the bird tray. Draw 1 card from the face-down bird deck and place it face-down in Automa’s supply. Face-down birds are worth 5 4 3 points at the end of the game (see Difficulty).
Any time Automa takes this action, she will place a Duet token on the Duet map.
Play a Bird
From the 3 face-up cards on the bird tray, pick up all that meet the requirement of Automa’s bonus card. Of these cards, Automa will keep 1 card with the highest point value. If there are multiple cards with the same highest point value, it makes no difference which one the Automa keeps. Place it faceup in Automa’s supply and discard the rest. Face-up birds are worth their stated point value at the end of the game.
For example, if Automa’s bonus card is Cartographer, which awards points for birds with geography terms in their names, she would pick up all bird cards that featured these names, place the one with the highest point value face-up in her supply, and discard the rest.
If no birds meet the requirement, draw 1 face-down bird card and place it face-down in Automa’s supply. Face-down birds are worth 5 4 3 points at the end of the game (see Difficulty).
Duet mode: Any time Automa takes this action, she will place a Duet token on the Duet map.
Lay Eggs
For each egg icon in the section for the current round on the Automa card, give the Automa 1 egg token from the supply.
Gain Food
If all dice in the birdfeeder show the same face, remove the remaining dice and toss all 5 dice into the top of the birdfeeder to refill it.
Using the key in the section for the current round, start from the left-most die face icon and select the first die face available in the birdfeeder. Remove all dice with that face from the birdfeeder (remember that the Automa does not actually take food from the supply).
Activate pink powers
Activate all pink powers of bird cards on your player mat (the Automa does nothing).
Remember: pink powers may only be triggered once between your turns. When the Automa card shows ‘Activate all pink powers’ it doesn’t activate any that have triggered since your last turn.
Place End-of-round Cube
Place 1 of Automa’s action cubes on the current round’s goal tile of the goal board.
Remove End-of-round Cube
Remove 1 of Automa’s action cubes from the current round’s goal tile and return it to Automa’s supply. If there are no cubes on the tile, ignore this action.
Automa’s Cache
Automa will gain cache tokens whenever you activate a white, teal, or brown power that should give her something. Food tokens are used to represent cache tokens for her; the type of food token has no significance. When this happens, do the following:
If she must pay something to participate, give her 1 token for each thing she will gain. Otherwise, give her 2 tokens for each thing she will gain. For example:
When activated: Each player may discard 1 from their to gain 1 ![]() (but not ) from the supply
(but not ) from the supply
Automa gains 1 cache token.
When played: All players lay 2 . You lay 2 additional
Automa gains 4 cache tokens.
In most cases, that’s all you need to know. Here are some additional rules for special situations:
When activated: Give 1 from your personal supply to another player to gain 2 from the supply – Discard the .
Automa gains 2 cache tokens. Anything you give to Automa is returned to the supply; she only gains the cache tokens.
When activated: Choose a food type. All players who do not currently have that food type may gain one from the supply.
Automa gains 2 cache tokens. Automa always fulfills any condition required to gain from your activated power.
When activated: All players may take a hummingbird action, starting with the player of your choice.
Automa gains 2 cache tokens. This is also true for hummingbird actions () gained on your turn.
Automa Interaction on Your Turn
Automa reacts when you activate a white, teal, or brown power that involves another player. If the power should give her something, Automa will gain cachehoard tokens. Below are other ways powers can involve another player and how Automa handles each:
Check if another player has something or check how many of something another player has
The number of cubes that Automa has on the current round goal tile represents how many she has of whatever is being checked.
When using the duet map from Wingspan Asia, the number of icons on Automa’s current Automa card represents how many she has.
Note: This means that she never has anything on your first turn of each round.
Another player gains or may gain
When another player gains or may gain something, Automa gains cache tokenshoard tokens. She always gains as much as possible.
Note: This is true for other action words (cache, draw, tuck) that give another player something.
Steal or otherwise gain from another player: Anything you “steal” or otherwise gain from Automa, comes from the supply, instead.
Use a power of another player’s bird
Use another player’s bonus cards
Whenever you play a bird with a power that allows you to use another player’s bonus card, draw 2 bonus cards and place them face-up in the supply. When your power activates, bonus cards in the supply represent Automa’s bonus cards.
Another player selects a card
When you give another player a choice between cards to keep, Automa chooses randomly.
Check the types of food that another player has
The dice in the birdfeeder tray represent the types of food that Automa has. When a die shows two food types, Automa has both. If the dice in the tray all show the same face, this check does not allow the dice to be rerolled.
Note: This only applies to the rare power that requires a check of all the different types of food another player has (e.g. Red-headed Barbet). To check a single, specific type of food use interactive rule 1.
Interacting with pink powers
The rules in this section are not applicable to pink (once between turns) powers. Whenever Automa activates pink powers on her turn, she does not participate in that action in any way. If another player is to gain something from a pink power, Automa gains nothing.
Scoring Automa End-of-round Goals
Automa’s quantity of the targeted item for end-of-round goal scoring is calculated using a base value (shown on the end-of-round goal scoring card) plus any cubes on the current round’s goal tile. The base value represents the lowest quantity of the targeted item that Automa will have.
Using the end-of-round goal scoring card for the current round, match the current round’s goal tile to the symbols on the card to find the base value. To this value, add the number of action cubes Automa has on this goal tile (if any). As with you, Automa’s quantity must be greater than 0 to score points for the goal. Note: Automa cannot exceed 5 birds for the ‘birds in a specific habitat row’ goal.
Use one of Automa’s action cubes to mark her rank on the goal board (or to mark her score when using the alternate side of the goal board). Return any action cubes on the goal tile to Automa’s supply.
Place the end-of-round goal scoring card for the next round beside the goal tile for the next round.
No goal: At the end of a round containing the "No goal" End-of-round goal, Automa gains in each habitat box on her Spent Nectar Collection card.
You must use the green side of the goal mat when including the hummingbird points goal, total of egg limits goal, or any goals with a single hummingbird group symbol.
Automa Difficulty Levels
You can adjust Automa’s difficulty to suit your play style.
Setup: Starting spent nectar per habitat
- Eaglet
- 3 nectar tokens
- Eagle
- 4 nectar tokens
- Eagle-eyed Eagle
- 5 nectar tokens
Setup: Automa hummingbird cards
- Eaglet
- Replace card 9 with Eaglet card
- Eagle
- No changes
- Eagle-eyed Eagle
- Replace card 10 with Eagle-eyed Eagle card
Game-end: Automa's CacheHoard
- Eaglet
- 1 egg/5 tokens
- Eagle
- 1 egg/4 tokens
- Eagle-eyed Eagle
- 1 egg/3 tokens
Game-end: Face-down bird cards
- Eaglet
- 3 points
- Eagle
- 4 points
- Eagle-eyed Eagle
- 5 points
Placing Automa Duet Tokens
When Automa takes the “Draw Cards” or “Play a Bird” action, she will place a Duet token on the Duet map. She ignores all restrictions regarding the bird card that was played and instead uses the icons along the right column of her Automa card along with the rules below.
Automa does not gain the bonus if she places a Duet token on a space with a bonus. She never places more than 1 Duet token per turn and will not place more than 15 Duet tokens per game.
 Navigate the Duet Map
- Map
- Round
- Type
- Habitat
When deciding where to place a Duet token, the icon in the right column of the Automa card that aligns with the map section of the Duet map tracker determines the order to evaluate spaces on the Duet map. This is called navigating the Duet map.
Each of the four corners of the Duet map image shown on the Duet map tracker card contains one of the four possible icons (well, one possibility is no icon, but we’ll treat that as an icon too).
Starting from the corner of the map indicated, Automa will check each space in that row until reaching the other side of the map. Then, she will return to the side she started from, move to the next row (upwards or downwards, depending on whether she started from the top or bottom row of the map), and check each space in that row, continuing like this until she finds a spot to place her Duet token.
For example, there is no icon at the top of the Automa card. The Duet map tracker shows “No Icon” in the top right corner, therefore she will look for a valid space starting with the space in the upper right of the Duet map. From there she will look, right to left, along the top row. Then, returning to the rightmost space of the next row down, she will continue looking, right to left, along that row. This continues until she finds a valid space.
After play a bird
After completing the “Play a Bird” action, Automa will place a Duet token on the Duet map based on the current round goal tile.
Based on the map section of the Duet map tracker, she will navigate the Duet map until she finds an available space that improves her progress with the Duet map goal for the current round. Place one of her Duet tokens on that space.
Note: If no space improves her progress, she simply navigates to the first available space, ignoring the goal.
After draw cards
After completing the “Draw Cards” action, Automa will place a Duet Token on the Duet map based on the Duet map tracker.
Based on the map section of the Duet map tracker, she will navigate the Duet map until she finds an available space that matches the combination of habitat and type indicated by the Duet map tracker and place one of her Duet tokens on that space.
To determine the habitat and type, compare the icons along the right column of the Automa card to the Duet map tracker, as follows:
- Compare the icon that aligns with type section of the Duet map tracker to determine the type (nest, food, or other)
- Compare the icon that aligns with the habitat section of the Duet map tracker to determine the habitat (grassland, wetlands, or forest)
Only map spaces with the correct combination of type and habitat are available for her to place a Duet token.
Using the example, the icon that aligns with the type section is so, as shown on the Duet map tracker, she must choose a food space. Similarly, the icon that aligns with the habitat section is so she must choose a space in the forest. Therefore, only food spaces in the forest are valid.
If Automa fails to find a valid available space to place a Duet token, she doesn’t place one.
Variant–Automa’s Hoard
In this variant, Automa will gain hoard tokens whenever you activate a white, teal, or brown power that should give her something. Food tokens are used to represent hoard tokens for her; the type of food token has no significance.
Do not use Automa’s Cache when using the Automa’s Hoard variant. This variant expands upon Automa’s Cache by giving specific values to the different resources that are exchanged but otherwise they work the same.
When you activate a white, teal, or brown power, for each thing Automa would gain and any things she would lose in exchange, do the following:
- For each or Automa would gain, give her 1 hoard token from the supply. For each she would lose, return 1 hoard token to the supply.
- For each Automa would gain, give her 2 hoard tokens from the supply. For each she would lose, return 1 hoard token to the supply.
- For each Automa would gain, give her 2 hoard tokens from the supply. For each she would lose, return 1 hoard token to the supply.
- For each Automa would gain, give her 3 hoard tokens from the supply. For each she would lose, return 2 hoard tokens to the supply.
- For each Automa would gain, give her 6 hoard tokens from the supply.
- For each (hummingbird action) Automa would gain, give her 3 hoard tokens from the supply.
In most cases, that’s all you need to know. Here are some additional rules for special situations:
When Automa gets to cache food or tuck a bird, give her 3 hoard tokens from the supply, instead. For example:
When activated: All players may tuck a from their hand under a bird in their and/or cache 1 from their supply on a bird in their .
Automa gains 6 tokens (3 for tuck and 3 for cache) and returns 2 tokens (1 for and 1 for ).
If Automa gets to choose the type of resource, she always chooses . For example:
When played: Draw 2 and keep 1. Other players may discard any 2 resources (![]() , , or ) to do the same.
, , or ) to do the same.
Automa gains 6 hoard tokens for the and returns 2 hoard tokens for the two .
Note: Automa will not participate in any power where she would lose more tokens than she would gain. For example:
When activated: All players may discard 1 . Each player that discards an gains 1 ![]() from the supply.
from the supply.
Automa does nothing because she would gain 1 token for the ![]() , but return 2 tokens for the .
, but return 2 tokens for the .
Nectar and the Oceania dice
Automa does not gain or use nectar. Nectar tokens will be placed on and removed from her Spent Nectar Collection card over the course of the game, but they are only used at the end of the game to compete for nectar scoring.
Spent Nectar Collection card
The Spent Nectar Collection card has 3 “spent” boxes to collect nectar tokens for each of the habitats.
Selecting Dice
Selecting dice from the birdfeeder works the same as in the base game with the following substitution on the key.
- When the key shows she takes .
- When the key shows she takes / .
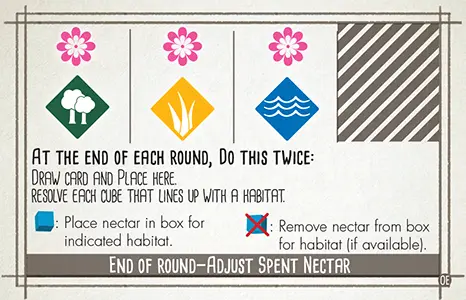
End of the Round—Adjust Automa’s Spent Nectar
Adjust her collection of spent nectar at the end of each round. Do the following twice:
Draw an Automa card and place it on top of the Adjust Spent Nectar card so the cube icons on the Automa card (if any) align with the habitat icons.
-
Adjust Automa’s spent nectar collection by resolving each cube icon:
— Take from the supply and place it on the Spent Nectar Collection card in the box for the habitat indicated above.
— Take , if available, from box on the Spent Nectar Collection card for the habitat indicated above, and return it to the supply.
Automarazzi (2-4 Players Against Automa)
Automarazzi can be played using the base game or with any combination of expansions. You may also play using the Automa’s Hoard variant. Automarazzi is played open-handed.
In addtion to exchanging resources during your turn (see below), playing with Automarazzi affects setup, round structure, and end game scoring.
Give Bird Cards to Other Players
At any point during your turn, you can give bird cards from your hand to other players. There is no limit to how many bird cards you can give away and you may give them to any combination of other players. However, for each card you give you must first discard one ![]() , , or . If you have nothing to discard, you cannot give a bird card. If you discard , it is returned to the supply.
, , or . If you have nothing to discard, you cannot give a bird card. If you discard , it is returned to the supply.
Take Eggs from Other Players
At any point during your turn, assuming the other player agrees, you may take 2 eggs from their player mat. Give 1 to Automarazzi and place 1 on any bird on your player mat (egg limit rule applies). There is no limit to how many times you can do this.
Give Food to Other Players
At any point during your turn, you can give ![]() to other players. There is no limit to how many you can give away and you may give them to any combination of other players. Give Automarazzi 3 hoard tokens for each given and 2 hoard tokens for each other
to other players. There is no limit to how many you can give away and you may give them to any combination of other players. Give Automarazzi 3 hoard tokens for each given and 2 hoard tokens for each other ![]() given.
given.
Automa's Hummingbird Action
During each of Automa's turns, after completely resolving the Automa card as normal, resolve a Automa hummingbird card.
If the section for the current round indicates it is a rainy day, nothing happens.
Otherwise, Automa takes a hummingbird action as follows:
-
Move 1 hummingbird from one space to another space in the hummingbird garden, as indicated by the arrow.
-
Advance the token that matches the hummingbird that moved, on Automa's hummingbird track once.
-
If the token lands on a space marked with a , advance the token again.
-
If the token would move off the end of the track, leave it on the last space and move the token on the column to the right. If the token is on the rightmost column, move the token on the leftmost column.
-
Note: This only occurs during Automa's turn. Whenever Automa gains a hummingbird action due to a bird power on your turn, it is simply treated as her gaining a resource and follows the Automa's Cache or Automa's Hoard rules.
Action Cubes
Action cubes are used to:
Perform and record your actions during your turn.*
Mark your score on the goal board at the end of each round.
Beak Pointing Left/Right
Beak pointing left
Beak pointing right
These icons refer to the direction a bird’s beak is pointing. Birds whose beaks are pointing straight ahead (or straight up) don’t count toward either the left or right-facing goal.
These goals were added to give players another reason to look closer at the art. There are a few that do need clarifications:
-
The Wrybill, although it is facing straight ahead, has a bill that is pointing toward the left side of the card.
-
The Common Loon has 1 bird facing in each direction, so it qualifies for both goals.
-
The Little Grebe has 1 bird facing in each direction, so it qualifies for both goals.
-
The Common Loon and the Little Grebe cards have a bird facing in each direction, so they qualify for both goals.
-
The Great Crested Grebe card has 2 birds facing the same direction: it counts as a single card that has a bird facing left.
The following is a list of the birds that are not pointing left or right.
- Australian Owlet-Nightjar
- Barn Owl
- Barred Owl
- Bearded Reedling
- Burrowing Owl
- California Condor
- Eastern Screech-Owl
- Eurasian Eagle-Owl
- Forest Owlet
- Great Horned Owl
- Horned Lark
- Kākāpō
- Little Owl
- Oriental Bay-Owl
- Rufous Owl
- Short-Toed Treecreeper
- Snowy Owl
- Spoon-Billed Sandpiper
- Spotted Owl
- Sri Lanka Frogmouth
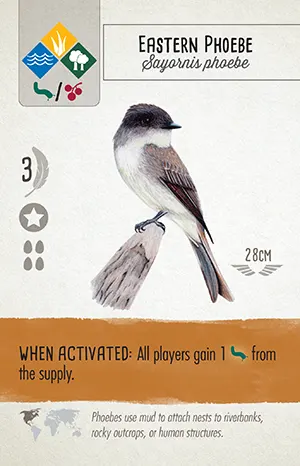
Bird Cards
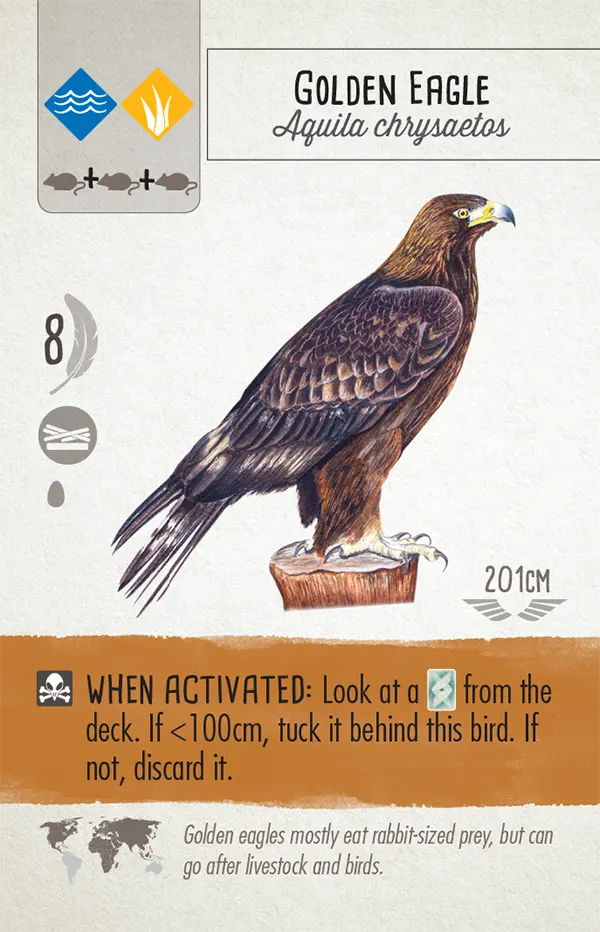


- Name
- Habitat
- Food cost
- Point value
- Nest type
- Egg limit
- Wingspan
- Bird power
- Power icon
- Range
- Factoid
Bird Powers
Powers on bird cards may include these icons:
-
This indicates that the bird is a predator.
-
This indicates that the bird’s power involves tucking other bird cards under it to represent the creation of a flock. Each of these tucked cards are worth 1 VP at end of game.
-
This indicates that the bird’s power involves drawing additional bonus cards.
The background of a bird power indicates when it occurs:
When Played (no color)
These powers may be activated only when a bird is played (never again after you play the bird).
When Activated (brown)
These powers may be activated from right to left whenever you use the corresponding habitat.
Once Between Turns (pink)
These powers may be triggered on opponents’ turns. You can only use a pink power once between each of your own turns (if an opponent triggers it). We recommend telling other players what the power is, and what activates it. Players should help each other notice when a bird with a pink power should be activated.
Round End (teal)
These powers are resolved when all turns in the round have been completed, but before scoring the goal for that round.
- Resolve them in player order, starting with the first player for the round.
- If you have more than one bird with round end powers, you may resolve your birds’ powers in any order.
- Round end powers do NOT activate “once between turns” (pink) powers.
Game End (yellow)
Some birds have yellow powers that activate only once, at the end of the game. Activate these powers after completing all end-of-round steps. If you have more than one bird with a “game end” power, you may activate them in any order. These birds do not trigger birds with pink “once between turns” powers.
The Birdfeeder
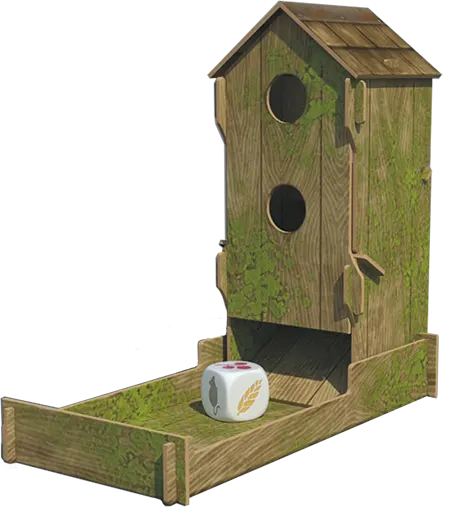
The birdfeeder has a tray to hold the 5 food dice. The dice removed from the birdfeeder when a player gained food will remain outside the tray until the birdfeeder is refilled.
If the birdfeeder tray is ever empty, throw all 5 dice back in.
If the dice in the tray all show the same face (including if there is only 1 die) and you are about to gain food for any reason, you may first throw all 5 dice back into the birdfeeder. (, , and each count as a unique facecounts as its own unique face.)
Bonus Cards
As described in Setup, each player starts the game with 1 bonus card (selected from 2 random cards).
There are also several birds with powers that allow you to gain additional bonus cards.
Bonus cards are all scored at end of game.
Cache
This refers to putting a food token on a bird (the bird is saving the food for later). You cannot spend that food token; instead, it’s worth 1 VP at end of game. If you run out of food tokens, you can cache cards instead (use discarded cards).
Draw Bird Cards and Activate Wetland Bird Powers
The cards available for you to draw are the 3 face-up cards on the bird tray and the top card of the bird deck.
When you choose to draw cards, do the following:
-
Place an action cube in the leftmost exposed slot in the “draw bird cards” row on your player mat, and use the actions on the space in the order they are printed:
-
You may discard any 1 food to reset the bird tray. This is optional.
-
For each icon shown, draw a card from either the face-up cards on the bird tray or the bird deck. There is no hand limit.
-
/ You may discard at most 1 egg from a bird on your mat or 1 nectar, to draw an additional card. This is optional.
-
-
Activate any brown powers on your wetland birds, from right to left. All powers are optional. End your turn by placing your action cube on the left side of the “draw bird cards” row.
-
Take a hummingbird action on the space where your action cube ended.
- If the space is empty, attract a hummingbird from the garden or deck and gain its benefit.
- If the space has a hummingbird, return it to the garden and advance one space on the hummingbird track.
Example: Draw 1 bird card, then you may discard 1 egg to draw another card. Next, you may activate the power on the bird card. Finally, you must take a hummingbird action.
Example: You may discard any 1 food to reset the bird tray, then draw 2 bird cards. Next, you may activate the power on the bird card. Finally, you must take a hummingbird action.
Managing the bird deck
As you draw face-up cards, they are not immediately refilled. Instead, wait until the end of your turn before refilling empty spaces on the bird tray. If the face-down deck is ever emptied during the game, reshuffle all discarded bird cards to form a new deck.
At the end of each round, discard any remaining face-up cards and replenish them with 3 new bird cards.
Duet Mode
Wingspan Asia includes a Duet mode for exactly 2 players.
Gameplay example
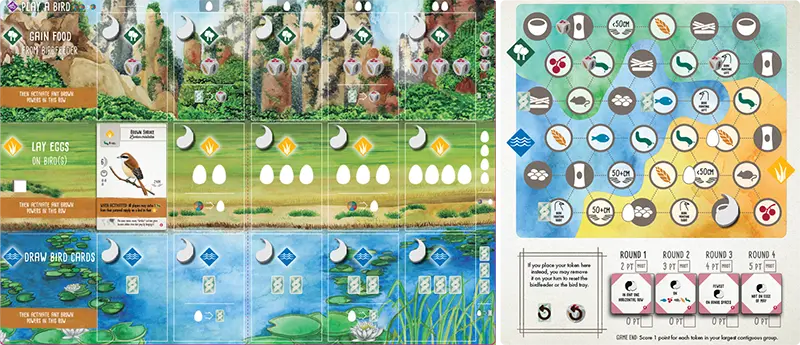
When you play a bird onto your player mat, place the Duet token from that spot onto an unclaimed space on the Duet map that matches the bird you played.
Bonus: Some spaces on the Duet map have bonuses. If the space that you use has an egg, card, or food die on it, you gain the item shown.
“Matching the bird” means:
- The space must be in the region of the Duet map that corresponds to the habitat where you played the bird.
- The symbol on the space must correspond to the bird you played:
- To use a nest space, the bird must have that nest symbol.
- Star nests are wild and can match any nest symbol on the Duet map.
- To use a food space, you must have spent that food.
- If you use the 2-for-1 food rule to play a bird, treat it as if you converted those two foods into the food you needed for the bird. Thus, you can use a space for the required food, not the 2 foods you spent to get that required food.
- The 50+ cm and <50 cm spaces correspond to the bird’s wingspan.
- To use a nest space, the bird must have that nest symbol.
- Note that it is not enough for a bird to have the correct habitat or food on the card; you must have played the bird in that habitat and used that food when playing the bird.
Do I place a token?
- Place a token on the map whenever you play a bird. This will usually occur through taking the “play a bird” action, but bird powers that allow you to play a bird (e.g., “play another bird in this habitat”) also count.
- Remember, the Duet tokens on each space of your player mat are only there as a reminder to use them, not a requirement for play. For example:
- Bird powers that move a bird do not cause a new Duet token to be placed on the Duet map.
- Some birds in other expansions allow you to play a bird on top of another bird. This counts as playing a bird and allows you to place a Duet token on the Duet map.
- In the unlikely event that you play more than 15 birds in a game (using all the Duet tokens), use a substitute.
Only one player can use each space.
If you cannot place a Duet token in a matching space or do not wish to, you may place your Duet token in the reset space on the lower left of the board instead. On a later turn, at any time on your turn, you may remove that Duet token to reset the bird tray or the birdfeeder.
Duet gameplay example
The Brown Shrike was played above in the grassland habitat of the player mat, so the player may place their Duet token on an unoccupied space in the grassland region with any of the following symbols: invertebrate, rodent, bowl nest, <50 cm, or left facing beak. In this example the white player placed their Duet token on a bowl nest symbol in the grassland region.
Eggs
Eggs are part of the cost of playing bird cards in columns 2–5. Also, each egg on the bird cards on your player mat is worth 1 point at the end of the game.
There is no limit to the egg supply. In the unlikely event that no eggs remain in the supply, use a temporary substitute.
Frequently Asked Questions
When I activate a habitat row, am I required to perform a hummingbird action at the end?
Yes, the hummingbird action mandatory (the rules would say “may” if it were optional).
If I activate a card power that says to attract or return a hummingbird, am I limited to the current habitat row?
No, for card powers like this, you can choose any habitat row.
In the rare case I move down on a hummingbird track, can I gain a hummingbird action from an icon on the track even if I previously gained an action from that icon?
You gain a hummingbird action whenever you move up a track onto or past a hummingbird icon (even if you’ve previously done so). Only up, not down.
When I gain food from the birdfeeder, do I choose all of the dice at once, or one by one?
Choose dice one at a time. This creates the potential for you to reroll in between dice selections.
What about when drawing multiple cards? Can I draw a card from the deck, look at it, and then decide where to continue drawing birds?
Yes, when drawing multiple cards, you can draw a card from the deck, look at it, and then decide to continue drawing from the deck or draw from the face-up cards.
Can I activate pink (“Once Between Turns”) powers after my final turn?
Yes, your pink power can activate once after your last turn.
Can you discard birds from your player mat?
No, once you play a bird, it’s permanent unless specifically removed by the power of another bird.
Can I choose to lay fewer eggs, gain fewer food, or draw fewer eggs?
Yes, you can always decline a benefit (though you can never decline a cost). This applies to the basic actions as well as bird powers. But remember, activating a particular bird power is optional, so you can avoid a cost associated with a bird power by skipping that power entirely.
What are the birds with the grey triangles in the corners?
These birds are part of the Swift-Start Pack which is included in all current printings of Wingspan. This Swift-Start Pack helps new players learn how to play the game with the 10 bird cards marked with grey corners and 4 player guides. The birds can be shuffled into the deck to be used as regular cards and can quickly be recognized and pulled out of the deck to use with the player guides when teaching new players.
When a bird says that I can “repeat” another bird’s ability in the same habitat, how does that work?
You can choose any other “when activated” bird in that habitat and perform its power. The bird can be to the left or to the right of the “repeat” bird. The “repeat” bird does not copy the power for itself, but allows another bird to activate twice this turn.
When activating “migrating” birds that can move from one habitat to another, does the action cube move with them? Can they move even if they’re the only bird in the original habitat?
The action cube stays in the original row, as that is the action you chose for this turn. And yes, they can move if they’re the only bird in the row. These birds can migrate as long as there is no other card to their right.
Can I reroll the dice in the birdfeeder if gaining food from a bird’s power? What about when there are qualifying terms such as “if available” or “if there is one?”
Yes. Regular reroll rules apply whenever you have the opportunity to gain food from the birdfeeder.
Automa: Who goes first each round, you or the Automa?
For each of the 4 rounds, you always go first and the Automa always takes the last turn.
Is the percentage on the Omnivore Expert bonus card correct?
No, it should be 16%, not 10%.
What does the Photographer score for 4-5 birds with colors in their names?
This is a typo. Instead of 2-3, it should say 4-5.
Should the Spotted Sandpiper be worth 5 points, not 4?
Yes, 5 is correct.
First Player
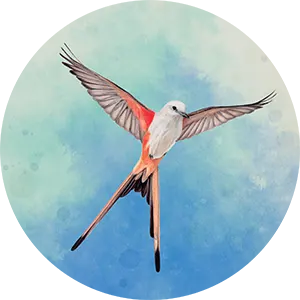
During setup, choose a first player and give them the first-player token.
At the end of each round, pass the first player token to the left. That person takes the first turn in the following round.
Flock Mode
Flock mode requires 2 simultaneous active players to speed up gameplay. You are still competing as individuals, just as you do in the base game. You will be assigned to a group that has its own bird tray and birdfeeder, and you will only use that group’s resources throughout the game. You will interact across groups in other ways, though: the whole table shares end-of-round goals, pink “Once Between Turns” powers, and any bird powers that affect other players.
Group Notes
- Other than assigning players to a certain set of dice and cards, the groups do not have any meaning in the game.
- Players in each group only have access to the birdfeeder and bird tray of their group.
- If a bird power refers to “any die,” you only have access to your group’s dice.
Gameplay
The 2 players that the turnorder dial points to are the active players. They take their turns simultaneously.
When both active players have completed their turns, rotate the turn-order dial clockwise. There are now 2 new active players who take their turns.
- To avoid confusion, be sure to wait for both active players to finish their turns before moving the turn-order dial. To help with this, active players should announce when they are done with their turns.
Continue until all players have completed their turns.
Special circumstances for 7-player games
In rounds 2 and 4, everyone has an odd number of turns. This will cause the person to the right of the first-player token to have 1 cube left at the end of the round when everyone else has finished their turns. They take 1 last turn alone at this point.
The 2 players on the edges of the 4-player group will be active players on the same turn for half of their turns, which might cause issues if they are both interacting with the dice or the bird tray. On these turns, the active players should resolve their turns one after the other, instead of simultaneously.
- Rounds 1 and 3: the star points to the first active player (marked “1,3” on dial)
- Rounds 2 and 4: the non-star is the first active player (marked “2,4” on dial)
On these turns, if the first active player draws cards, the bird tray refills at the end of their turn, before the second active player takes their turn.
Interactions with the Oceania Expansion
Nectar: All players need access to nectar as a resource. Split the dice from the Oceania Expansion between the two birdfeeders (2 nectar dice and 3 regular dice per birdfeeder). Score nectar with friendly ties, like the end-of-round goals: more than one player can be in first place, and second place is still awarded to the player(s) who have the next-highest amount of nectar.
Emu: Gain all the seed from your group’s birdfeeder. When you distribute seed, you may distribute it to anyone at the table.
Flocking
The birds with this power are known for gathering in large single-species flocks. As described on these cards, you can build a flock of a certain species by tucking cards face-down under that bird card. Each tucked card is worth 1 point at end of game.
Food
-
Fish token
-

Fruit token
-
Rodent token
-
Invertebrate token
-
Seed token
-

Nectar token
Food is primarily used to play bird cards, but some birds cache food that is worth VP at end of game.
There is no limit on how many food tokens you can have by your mat or on your birds, nor is there a limit on food tokens in the supply. In the unlikely event that any type of food token is unavailable in the supply, use a temporary substitute.
Gain Food and Activate Forest Bird Powers
Food is primarily used to play bird cards. Your options for which food to gain are shown on the dice in the birdfeeder, which will repeatedly get depleted and refilled throughout the game.
When you choose to gain food, do the following:
-
Place an action cube in the leftmost exposed slot in the “gain food” row on your player mat, and use the actions on the space in the order they are printed:
-
You may discard any 1 food to reset the birdfeeder. This is optional.
-
For each icon shown, gain food from dice you select from the birdfeeder. For each food that you gain:
- Remove a die from the birdfeeder and put it on the table.
- Gain a food token matching the icon on the die and place it next to your player mat. Your food tokens are public information.
You always gain 1 food token per die. With thea die face that shows , , or , gain 1 token of either type (not 2 tokens).
-
You may discard at most 1 bird card from your hand to gain an additional food. This is optional. When you gain this extra food, you must choose among the dice that are remaining in the birdfeeder.
-
-
Activate any brown powers on your forest birds, from right to left. All powers are optional. End your turn by placing your action cube on the left side of the “gain food” row.
-
Take a hummingbird action on the space where your action cube ended.
- If the space is empty, attract a hummingbird from the garden or deck and gain its benefit.
- If the space has a hummingbird, return it to the garden and advance one space on the hummingbird track.
Example: Gain 1 food token from a die, then you may discard 1 bird card to gain another food token from a die. Next, you may activate the power on the bird card. Finally, you must take a hummingbird action.
Example: You may discard any 1 food token to reset the birdfeeder, then gain 2 food from the birdfeeder. Next, you may activate the power on the bird card. Finally, you must take a hummingbird action.
Taking a Hummingbird Action
When you finish taking a row action (moving your cube from right to left), you will reach a hummingbird space. Either attract or return a hummingbird following the rules explained here.
If the space is empty, ATTRACT a hummingbird to it.
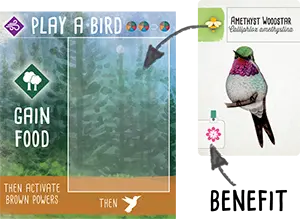
- Choose a hummingbird and place it on the empty space. Either gain the topmost face-up hummingbird from the garden or draw one from the deck.
- Gain the benefit shown in the bottom left of the hummingbird card.
If the space contains a hummingbird, RETURN the hummingbird.

Example
- Place the hummingbird on any space in the garden. You will usually cover another hummingbird.
- Move up one space on the hummingbird track. You may move up in the column that matches the group of either:
- the hummingbird you returned OR
- the hummingbird you covered
When moving up the hummingbird track:
- If your token lands on a space marked with a , take another hummingbird action (attract or return), in any habitat.
- If your token would go off the end of the track, leave it on the last space and move another token of your choice instead.
No takebacks. You can never attract a hummingbird that you returned earlier on the same turn. (The opposite is fine—you may attract a hummingbird and then return it to the garden on one turn if you have the hummingbird actions to do so.)
No bumping. To attract a hummingbird to your preserve, you must have an empty space for it to land in.
Hummingbird Benefits
When you attract a hummingbird, gain the benefit shown in the bottom left of the hummingbird card.
-
Draw 1 bird card.
-
Gain 1 nectar from the supply.
-
Lay 1 egg on a bird in your preserve.
-
Gain 1 benefit based on the row the hummingbird is in.
- Gain 1 food from birdfeeder.
- Lay 1 egg.
- Draw 1 bird card.
-

Advance any 1 token on the hummingbird track.
Managing the Hummingbird Garden
For refilling and resetting, the hummingbird garden follows the same rules as the bird tray:
-
Refill any empty slots in the hummingbird garden at the end of each player’s turn.
-
Reset the hummingbird garden at the end of the round. Discard all hummingbirds and then refill. (Do this during the same step as resetting the bird tray.)
-
If the deck runs out, shuffle the discards to make a new deck.
Hummingbird Groups
Each hummingbird has a //// symbol in the upper left corner, representing a broad taxonomical group.
When you return a hummingbird, you advance on the hummingbird track in the column matching its group — or the group of the hummingbird you cover. See scoring for how columns score at end of game.
-
Bees & Mountaingems (Mellisugini & Lampornithini) The Bee Hummingbirds include most migratory hummingbirds, including the three species in the base game of Wingspan. The species that this group is named for—the Bee Hummingbird—is the smallest bird in the world, with a wingspan of about 3.5cm.
-
Brilliants & Coquettes (Lesbiinae) This clade’s scientific name is derived from one of its members, the genus Lesbia. It’s a reference to the island of Lesbos.
-
Emeralds (Trochilini) In 1758, Linnaeus created just one genus of hummingbirds and called it Trochilus; the two birds still carrying that name are in this group. The Trochilidae family now contains over 110 genera. The word trochilus is first known from Herodotus and Aristotle, who described a small bird cleaning the mouths of crocodiles—definitely not a hummingbird.
-
Mangoes (Polytminae) Using the name mango for some hummingbirds was a mistake that stuck—someone mixed up a hummingbird specimen with a Eurasian Golden Oriole, also known as a mango bird.
-
Topazes, Jacobins, & Hermits (Florisuginae & Phaethornithinae) Evolutionarily, Topazes and Jacobins are the oldest group of hummingbirds; the Hermits are the next oldest.
Hummingbird Scoring
At the end of the game, you will score (or lose) points for each of your tokens on the hummingbird track. Points are printed on the right of the track. This player scores as follows.
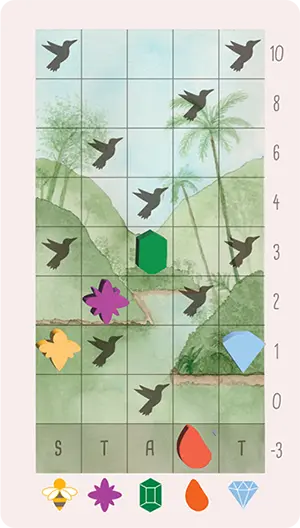
Optional Variant—Shorter Game
In playtesting Wingspan Americas, we found that the hummingbirds add some extra time that is most noticeable at 4-5 players. If you find yourself wishing for a shorter game, simply remove 1 action token from each player before the start of the game (thanks to the hummingbirds, you will still accomplish just as much as in a normal game of Wingspan).
Hummingbirds Are Birds
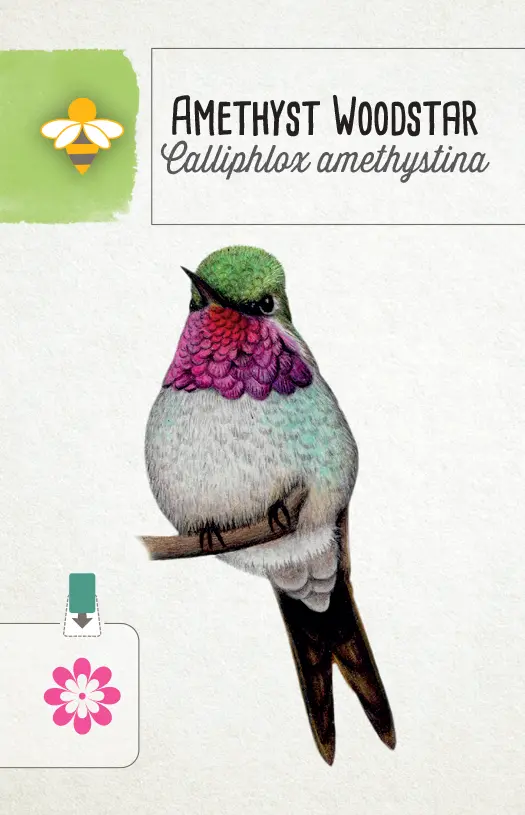
For actions or scoring conditions that count birds, hummingbirds are birds. A hummingbird on your mat counts as being in your preserve and in that habitat. Conversely, if your hummingbird space is empty, it counts as an empty space in that habitat.
However, hummingbird actions are attract and return. If a bird’s power or other rule refers to play or discard actions, it does not refer to hummingbirds. If you mix the Americas expansion with Wingspan Asia, attracting a hummingbird does not allow you to place a token on the Duet map.
Hummingbird spaces can only hold hummingbirds. For example, you cannot play a bird like the Common Buzzard on top of a hummingbird in one of these spaces. You cannot tuck cards, cache food, or lay eggs on hummingbirds.
Hummingbird cards have the following characteristics:
- Wingspan: Treat all hummingbirds in the Americas expansion as being smaller than any wingspan criterion in the game and smaller than any other bird in your preserve. Their actual wingspans range from approximately 3.5cm (Bee Hummingbird) to 22cm (Giant Hummingbird)—so there are other birds in Wingspan that are smaller than the Giant Hummingbird, but we’re keeping the rule simple.
- Score: 0 (they earn you points in a different way)
- Habitat: They can live in all habitats.
- Food cost: 0
- Egg limit: 0
- Power: none (white)
- Their names count toward bonus cards that look at bird names.
All of the above applies only to the small hummingbird cards included in the Americas expansion. You should continue to use the hummingbird cards from the base game (Ruby-Throated, Anna’s, and Black-Chinned) as originally printed!
Lay Eggs and Activate Grassland Bird Powers
Eggs are part of the cost of playing bird cards in columns 2–5. Also, each egg on the bird cards on your player mat is worth 1 point at the end of the game.
When you choose to lay eggs, do the following:
-
Place an action cube in the leftmost exposed slot in the “lay eggs” row on your player mat, and use the actions on the space in the order they are printed:
-
Lay an egg for each icon shown.
To lay an egg, gain an egg token from the supply (color doesn’t matter) and place it on a bird card that has space for it, according to its egg limit. The egg will stay there for the rest of the game, unless discarded.
Example: five egg limit
You can lay eggs on any combination of birds (including all on 1 bird), but each bird has an egg limit. A bird’s egg limit is shown by the egg icons. A bird card can never hold more than this number of eggs.
It is possible that you will have more capacity to lay eggs (based on your player mat) than you have spaces on your birds. Any excess beyond your egg limit is lost.
-
/
You may discard at most 1 bird card, or pay at most 1 food token to lay an additional egg. This is optional.
-
-
Activate any brown powers on your grassland birds, from right to left. All powers are optional. End your turn by placing your action cube on the left side of the “lay eggs” row.
-
Take a hummingbird action on the space where your action cube ended.
- If the space is empty, attract a hummingbird from the garden or deck and gain its benefit.
- If the space has a hummingbird, return it to the garden and advance one space on the hummingbird track.
Example: Lay 2 eggs, then you may pay 1 food to lay another egg. Next, you may activate the power on the bird card. Finally, you must take a hummingbird action.
Nectar
The Oceania expansion introduces nectar as a new food type and replaces the dice in the birdfeeder with new ones that provide nectar.
Some hummingbirds provide nectar, which is a wild food type that was first introduced in the Oceania expansion.
When paying food to play a bird, use an "any food" bird power, or upgrade an action, nectar is a wild food.
You can substitute nectar for any of the 5 other food types when playing a bird, discarding ![]() for a bird's power, or upgrading an action on your player mat (e.g., discarding a food to lay an extra egg:
for a bird's power, or upgrading an action on your player mat (e.g., discarding a food to lay an extra egg: ![]() ).
).
Some birds have nectar as a food cost. The normal rule that you can spend 2 food tokens as if they are any 1 food token also applies to nectar.
The
symbol always includes nectar. If you find that this rule makes the Chihuahuan Raven and Common Raven in the base game too powerful, remove those two birds from the deck while playing with the Oceania Expansion.
When bird powers refer to a specific food type, nectar is not a wild food.
If a bird's power looks for rodents in the birdfeeder, for example, do not also count the nectar there.
If you are not playing with the Oceania expansion, nothing special happens to nectar at the end of the round, and spent nectar is not placed on your player mat.
Any nectar remaining in your personal food supply at the end of the round is discarded.
You cannot carry over any nectar from round to round.
Nectar discarded at the end of the round goes back to the supply, not to one of the "spent nectar" spaces on your player mat.
This rule only applies to unspent nectar in your personal food supply. Do not discard the nectar on your "spent nectar" spaces or cached on your birds.
When spending nectar to play birds, use an "any food" bird power, or upgrade an action, put it onto the "spent nectar" space for that habitat.
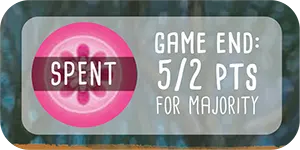
You can put nectar onto your mat when:
you spend nectar as part of a bird's food cost (nectar costs paid with an
= are not placed on the "spent nectar" space. The nectar never enters your supply.)you spend nectar on a bird power that has the
icon. (Remember, if the bird power lists a specific food, you must use that food. Nectar is not wild for bird powers.)you spend nectar to pay for one of the action upgrades printed on your player mat (such as resetting the birdfeeder or card tray, or gaining more eggs or cards).
You must put it on the same row where you spent it: when playing a bird, put it in the row where you played the bird. Otherwise, put it in the row that you activated that turn.
You may not trade away nectar in the ![]()
![]() =
= ![]() conversion. Nectar is already wild.
conversion. Nectar is already wild.
At game end, count who has the most nectar tokens in the "spent nectar" space of each habitat. Award points as shown on the player mat. In each habitat:
- The player with the most nectar receives 5 points, and
- The player with the second-most nectar receives 2 points.
As with the end-of-round goals, you must have at least 1 nectar token in a habitat to qualify for the nectar points for that habitat. If two or more players are tied, add the points and divide them evenly, rounded down. For example, two players tied for most nectar would each receive 3 points. Two players tied for second most nectar would each receive 1 point.
Nests
Each bird has a nest icon beneath its score. These nest icons can be important for end-of-round goals and bonus cards. The 4 types of nests are:
-
Bowl
-
Cavity
-
Ground
-
Platform
-
Star nests are wild. (These birds build unusual nests that don’t fit into the four standard types.) These can be powerful, because they can match any other nest type for goals, bonus cards, and bird powers.
Play a Bird from Your Hand
Before choosing to play a bird from your hand, consider its habitat, food requirements, and egg cost. Each bird has habitat and food requirements, shown in the upper left-hand corner of the card. Additionally, there may be an egg cost shown at the top of the column in which you’re playing the bird (there is no egg cost for the first column). If you cannot afford to pay the full cost, you cannot play the bird.
When you choose to play a bird, do the following:
-
Select a bird card in hand to play and place an action cube at the top of the column in which you will play the bird. Pay the corresponding egg cost (if any) by discarding eggs from any birds on your player mat. To play a bird in column 2 or 3, you must discard 1 egg to the egg supply. In columns 4 or 5, you must discard 2 eggs.
-
Pay the bird’s food cost. Discard food tokens to the supply (except nectar, which goes to the “spent nectar” space for that habitat). These tokens must be from next to your player mat, not food tokens cached on bird cards. The types of food are:
-
Fish
-
Fruit
-
Rodent
-
Invertebrate
-
Seed
-
Nectar
-
Wild: If a bird’s food requirement includes a wild icon, you can use any of the 5 types of food for it.
-
No Food: A crossed-out circle means a bird does not have a food cost.
-
Or: This icon in bird costs and other places in Wingspan means “or” (e.g., pay 1 fish or 1 fruit).
= When playing birds, you may spend any 2 food tokens as if they are any 1 food token. This exchange cannot be used during other parts of the game. For example, if you need 1 fish, you could use any other 2 food tokens instead.
Some birds have an * in the cost; this is to indicate that they have an alternative cost noted in text on the card.
-
-
Place the bird card on the leftmost exposed slot in its corresponding habitat and move your action cube to the left side of the “play a bird” row. The three habitats are:
If multiple habitat symbols are shown on the bird card, you can choose which habitat (row) to place it in. Your player mat limits you to a maximum of 5 birds in each habitat.
-
If the bird has a power that reads, “when played”, you may use that power. Other powers (with a color background) are not used when the bird is played. Playing a bird is the only action that does not activate a row of birds.
Player Mat
Your player mat has four rows where you take actions on your turn. Three of the rows are habitats where your birds will live.

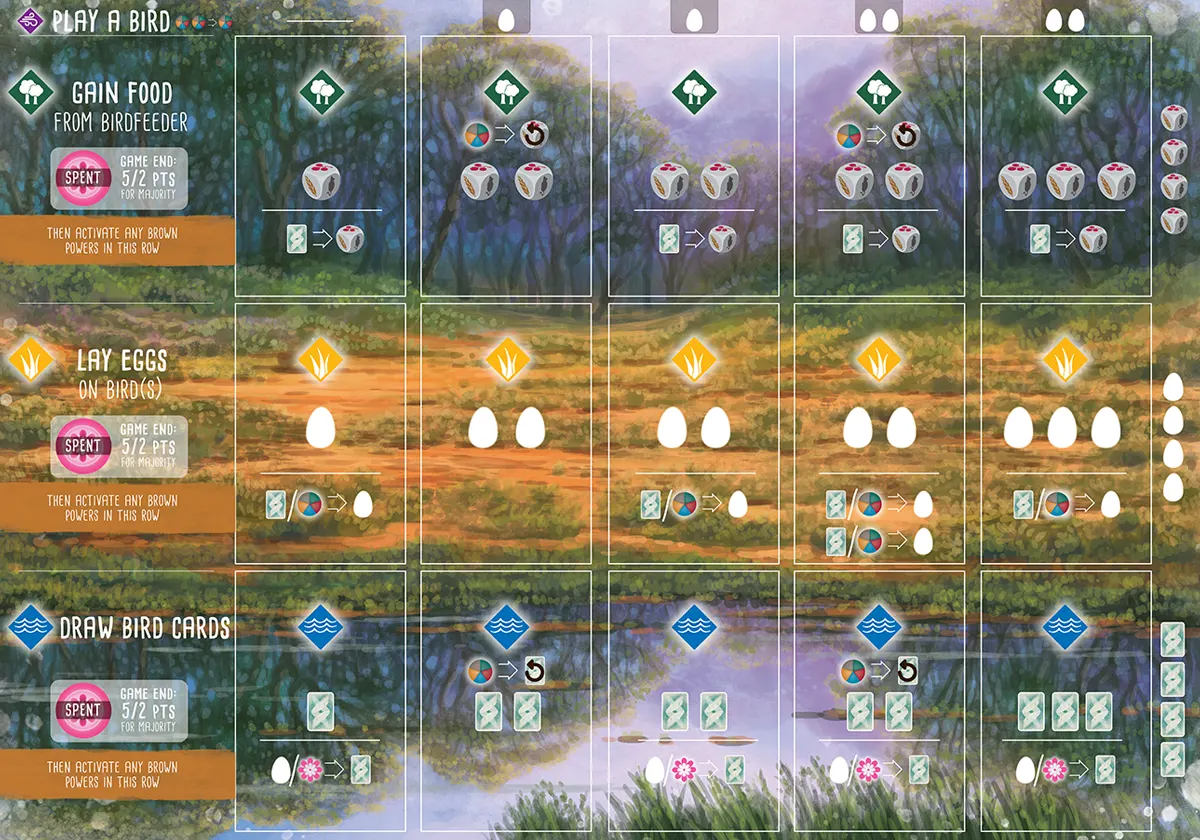
-
Play a Bird
= Reminder: You may spend any 2 food tokens as if they are any 1 food token.Additional egg cost when playing a bird in this column.
-
Forest Habitat — Gain Food
You may discard any 1 food to reset the birdfeeder.
Gain a food from the birdfeeder.
You may discard a bird card to gain an extra food from the birdfeeder.
-
Grassland Habitat — Lay Eggs
/
You may discard a bird card or any food token to lay an additional egg.
-
Wetland Habitat — Draw Bird Cards
You may discard any 1 food to reset the bird tray.
Draw a bird card from the deck or bird tray.
/ You may discard an egg token or a nectar token, to draw an additional bird card.
Use the actions on each space in the order they are printed: Reset if you are going to, then take food or cards.
Adjacency
If a card refers to adjacent birds, it’s referring to orthogonal adjacency (birds immediately to the left or right, and those immediately above or below the given bird).
Predator
With these powers, birds go hunting for a smaller bird, a rodent, or a fish. If they find one, they keep it, and it counts as a point at the end of the game.
Reset
-
When you reset the bird tray, discard the cards in the bird tray and refill it with three new cards from the bird deck.
-
When you reset the birdfeeder, re-roll all five food dice.
Example: Return a Hummingbird
Your hummingbird space is already filled with the Sparkling Violetear. You return the Sparkling Violetear to the garden board and cover the Crimson Topaz. You may move up in either the Mango (Sparkling Violetear) or Topaz (Crimson Topaz) columns.
Scoring End-of-Round Goals
To indicate the points you score from a goal, each player must place an action cube on the goal board (even if you score 0 points). The board has 2 sides, each using a different scoring method. Green is the default, but blue is good for new players. Points are only awarded to the player who contributes the most to each end-of-round goal:
Green: Majority of the targeted item
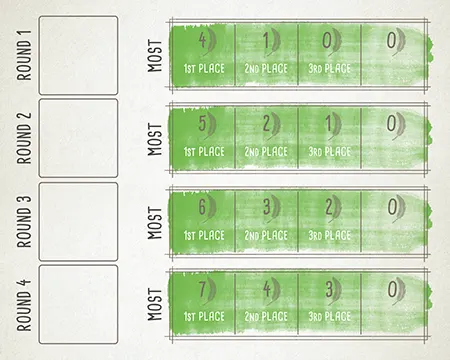
This method uses the side of the goal board that has spaces for 1st, 2nd, and 3rd place.
At the end of the round, count your quantity of the targeted item. Players compare their results and place their action cubes based on their rank order.
If players tie, place both cubes on the tied place, and do not award the next place. At game end, you will add the points for that place and the next place(s), then divide by the number of players who tied and round down (4th place scores 0 points).
For example, when using the goal that scores 5, 2, or 1 points, if two players tie for 1st place, each gets 3 points (5 + 2 divided by 2 players, rounded down). Do not award 2nd place to another player.
You must have at least 1 of the targeted items to score points for a goal. For example, you must have at least 1 grassland bird to score points for the “most birds in the grassland habitat” goal.
If you finish in 4th or 5th place, you must still place an action cube on the goal board in the space marked 0.
Blue: One point per targeted item
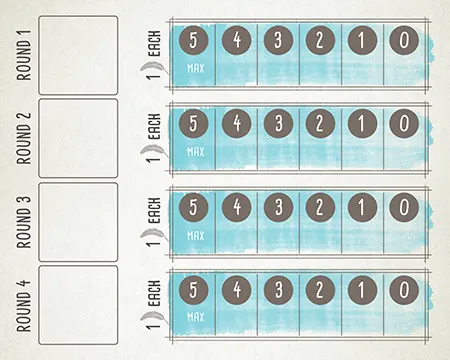
This method uses the side of the goal board that has spaces labeled 5–4–3–2–1–0 next to the space for each goal.
At the end of the round, count your quantity of the targeted item. Score 1 point per item, with a maximum of 5 points. Use an action cube to mark your score on the goal. If you do not have any of that item, you must still place an action cube on the goal board in the space marked 0.
- The player who comes first on the goal places a cube in the space marked above the goal tile and gets the points marked there.
- The player who comes second on the goal places their cube below the tile and gets zero points.
- The player who comes second on the goal also gets the first-player token for the next round.
- Ties are friendly: Both players get the points. In the case of a tie, the first-player token goes to the player who did not have it this round.
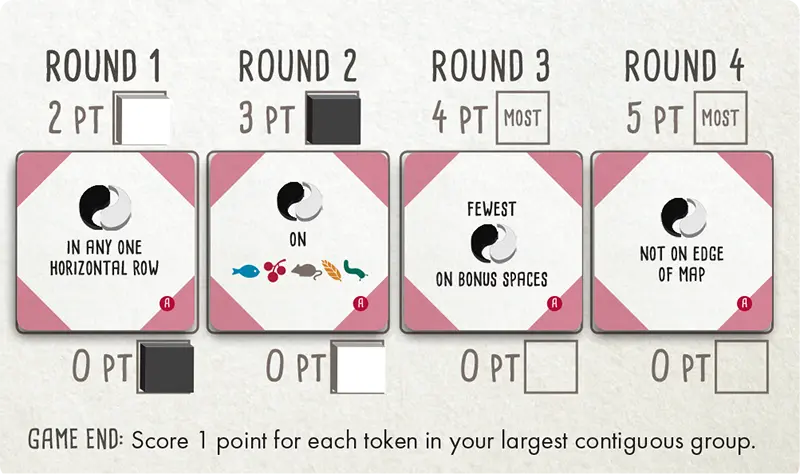
Example: Scoring Duet goals
Flock Mode Goal Board
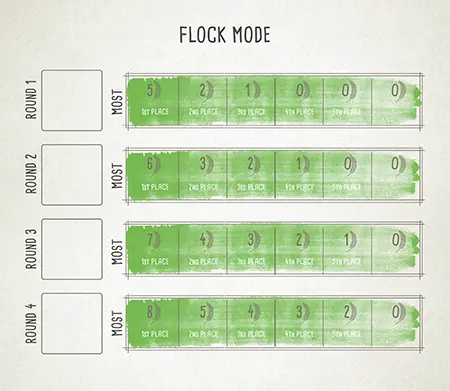
At the end of the round, count your quantity of the targeted item. Players compare their results and place their action cubes based on their rank order.
In Flock mode, ties are friendly: For example, if 2 players are tied for first place, they both get full points, and second place is still available.
You must have at least 1 of the targeted items to score points for a goal. For example, you must have at least 1 grassland bird to score points for the “most birds in the grassland habitat” goal.
Tucked Cards
Flocking bird powers and some predator powers allow you to tuck a card.
To tuck a card, place it face-down under a played bird card.
Each of these tucked cards are worth 1 VP at end of game.
Turn Structure
During each round, players take turns—proceeding clockwise—until each player has used all of their available action cubes.
On your turn, you will take 1 of 4 actions, as shown on the left side of your player mat:
-
Play a bird from your hand
-
Gain food and activate forest bird powers
-
Lay eggs and activate grassland bird powers
-
Draw bird cards and activate wetland bird powers
Using Action Cubes
To place a bird from your hand onto a habitat, place an action cube on the Play a Bird spot above where you will play the bird. Pay the bird’s food and egg cost, then place the bird on your mat, only triggering that bird’s “when played” power (if any).
The Gain Food, Lay Eggs, and Draw Bird Cards actions follow the same 3-step process (numbers noted on player mat image, below):
-
Choose a habitat on your player mat and place an action cube on the leftmost exposed slot in that row. Gain the benefit of that slot.
-
Move your action cube from right to left, activating any birds with a brown “when activated” power in that row. Each power is optional.
-
When the action cube reaches the far left, leave it there. Your turn is over.
Wingspan
Example: a 30 centimeter wingspan
The wingspan of each bird is used for comparison for some bird powers.
Flightless Birds
A few birds in the deck have a * symbol for their wingspan. These are flightless birds, and some have only vestigial wings. For any bird power or bonus card that contains a condition on wingspan, flightless birds function as wild cards. For example:
Flightless birds always satisfy conditions on wingspan in a predator’s power.
Flightless birds can be treated as having any value for bonus cards that give points for birds with wingspans in ascending or descending order.